IPgrab - Claiming itself as a verbose packet sniffer, it provides a very clean overview of packet data. However I would prefer to call it as high level protocol analyzer since it is very effective especially to analyze the network traffic since it provides intuitive and human readable output.
IPgrab is no longer in development, and considered to be very old tool, you can find it's one and only manual at here. The manual itself hasn't showed much of it's usabilities so I take a chance here to demonstrate it. Never underestimate an old tool, it is very useful especially when ethereal/tethereal is not available. I didn't install IPgrab from source since it is available via FreeBSD package/port. To install it, simple make install or pkg_add -r will do.
IPgrab is no longer in development, and considered to be very old tool, you can find it's one and only manual at here. The manual itself hasn't showed much of it's usabilities so I take a chance here to demonstrate it. Never underestimate an old tool, it is very useful especially when ethereal/tethereal is not available. I didn't install IPgrab from source since it is available via FreeBSD package/port. To install it, simple make install or pkg_add -r will do.
To run it as sniffer, just type
shell>ipgrab -i vr0 -w ipgrab-blog.pcap
ipgrab 0.9.8
Listening on device vr0 (ethernet)
^C340 packets received
0 packets dropped by kernel
ARP: 0
IP: 0
ICMP: 0
IGMP: 0
UDP: 0
TCP: 0
IPX: 0
GRE: 0
IPv6: 0
ICMPv6: 0
OSPF: 0
RSVP: 0
AH: 0
ESP: 0
I try to ctrl+c to terminate it after I have gather enough packets to play with, however the statistic that showing none is actually no accurate, I'm still wondering why the output shows nothing however that's fine because I can read the pcap file later using ipgrab too.
To read the pcap file and get summary of protocol statistic, just run
shell>ipgrab -lnta -r ipgrab-blog.pcap
You may find the output in the screenshot below.

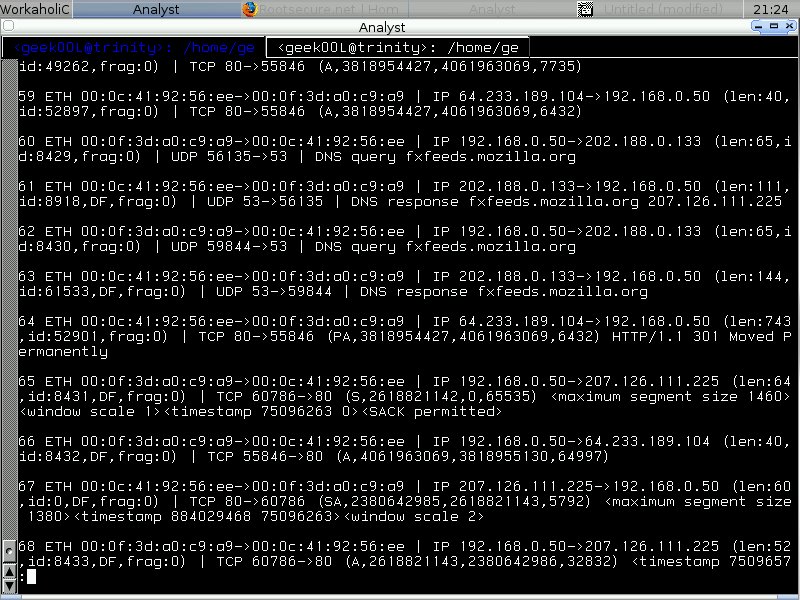
IPgrab provides minimal and main mode, the minimal mode normally won't show every single field. It is more to quick viewing especially when you are doing testing. You can just run it with -m switch. You may find it is far more easy to read it's output than tcpdumps' with | separating each layer.
I don't think it is good idea to use IPgrab to capture traffic since you can't tweak much on the snap-length and it's default snap-length is 1514 which is actually enough for normal frame but what if you happens to have jumbo frame. That's why I think it is better to use IPgrab to perform protocol analysis. BPF filter can be used too however I'm covering it here and I think most people have enough with tcpdump :).
Here's the output of IPgrab when running in main mode(verbose), everything is so readable and in order.
Here's the output of IPgrab when running in main mode(verbose), everything is so readable and in order.
Each packet is separated by the asterisk line and each layer is separated by the dash line. You can ignore any layer of data to be displayed by using different switch. Those are the switches I think is important.
-l ignore link layer
-n ignore network layer
-t ignore transport layer
-a ignore application layer
-p display unknown apps payload in hex
-x display hexdump of each field
-d dump padding if any exists
I ignore the link layer to be displayed by running
shell>ipgrab -l -r ipgrab-blog.pcap
You may see in the screenshot below that the packet shown started with layer 3 instead of layer 2 which is Network layer(IP) and go to Transport layer(TCP) next below it .....
and at last application layer(HTTP) .....

To concentrate on Transport Layer Data in order to detecting anomaly transport layer header(TCP/UDP). You can pipe to less command so that you can navigate the output.
shell>ipgrab -lna -r ipgrab-blog.pcap | less
Maybe sometimes we need to locate all the source port, you can actually run
shell>ipgrab -lna -r ipgrab-blog.pcap | \
grep 'Source port' | awk '{ print $1, $2, $3 }'
Source port: 80
Source port: 59467
Source port: 80
Source port: 59467
Source port: 80
Source port: 80
Source port: 59467
Source port: 80
Source port: 59467
Source port: 59467
Source port: 59467
Source port: 80
Source port: 59467
Source port: 80
Source port: 59467
Source port: 80
Source port: 80
.....
If you are not quite satisfying with the output, you can run this to extend the visibilities of source port distribution,
shell>ipgrab -r ipgrab-blog.pcap | \
grep 'Source port' | awk '{ print $1, $2, $3 }' | \
sort | uniq -c
10 Source port: 137
2 Source port: 138
1 Source port: 49249
18 Source port: 50028
1 Source port: 50038
1 Source port: 50863
1 Source port: 51605
1 Source port: 52172
22 Source port: 53
1 Source port: 53517
17 Source port: 54021
1 Source port: 54133
1 Source port: 54205
6 Source port: 54422
1 Source port: 55034
1 Source port: 55588
4 Source port: 55846
1 Source port: 56135
1 Source port: 56410
1 Source port: 56633
1 Source port: 56747
4 Source port: 57207
1 Source port: 57697
1 Source port: 58065
1 Source port: 58118
15 Source port: 58129
23 Source port: 59467
1 Source port: 59844
5 Source port: 60786
1 Source port: 62755
1 Source port: 63354
1 Source port: 64651
1 Source port: 64815
1 Source port: 64935
99 Source port: 80
The number in the first field indicates how many times the port been used, for example port 80 was used 99 times.
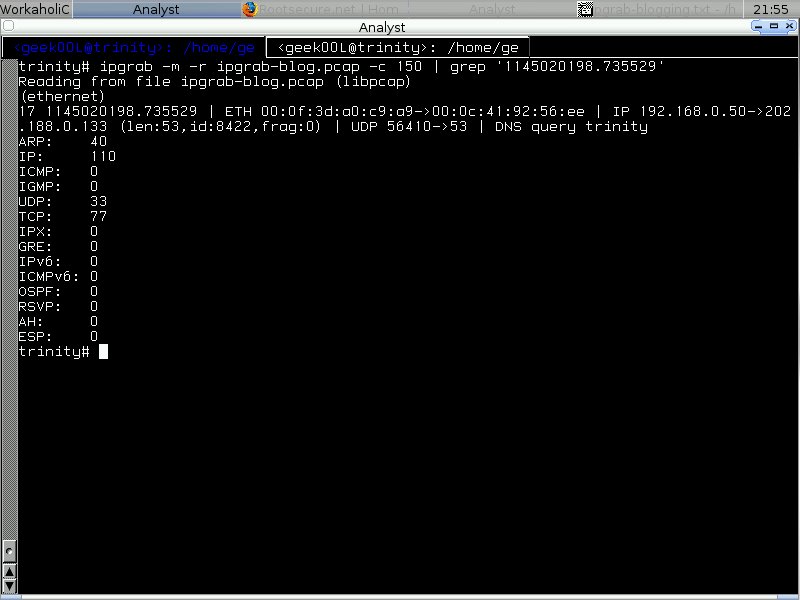
By default IPgrab will add the timestamp to the packet, so since it is unique number, we can use it to locate and search for the certain packet we want when we want to view it's content verbosely. Normally if running -r using main mode is killing since it might be wasting time if we have largest pcap file. So the best way should be running it in minimal mode when we need to navigate the packet and only view the packet of interest in full content data. Here's the trick to do it.
shell>ipgrab -m -r ipgrab-blog.pcap -c 150
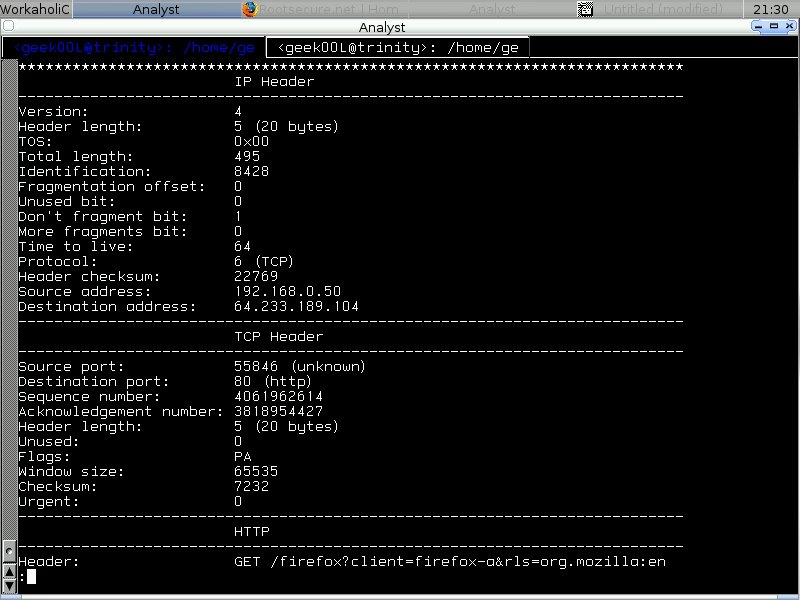
For example packet we are interested in with timestamp of 1145020198.735529
Hence we run the command and pipe it to less
shell>ipgrab -r ipgrab-blog.pcap | less
Using less is very flexible, normally when you run the command and pipe it to less, you may see : at the last line of screen, you can search string by typing /, then type the string you want to
search (you may know this is vi alike stuff)
search (you may know this is vi alike stuff)
/1145020198.735529
Here's the screenshot for the packet with timestamp 1145020198.735529

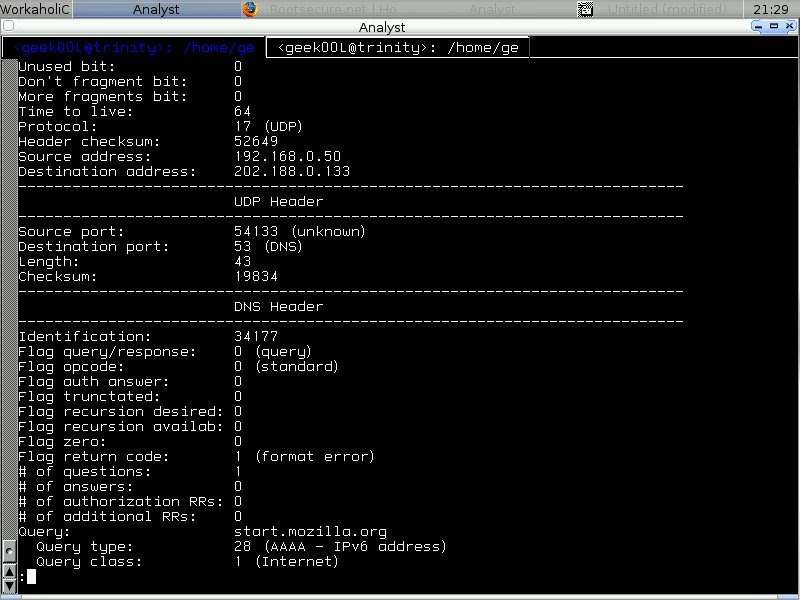
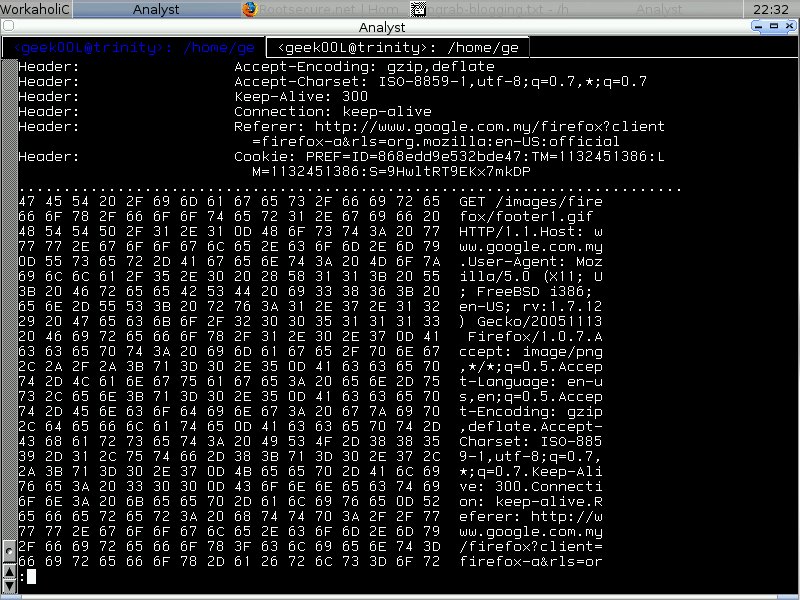
We can also oncentrate on Application Layer Data(If you are actually looking for pattern in application layer to write IDS signature). You need the data to be dump in hex format, just run ipgrab with -x switch. I ignore other layer here and only show application layer with -lnt switch.
shell>ipgrab -lnt -x -r ipgrab-blog.pcap -c 30 | less
DNS output(Hex|Ascii) -

HTTP output(Hex|Ascii) -
IPgrab is very flexible and versatile tool when we use it to analyze network traffic especially it decodes protocol pretty well. For protocol that it doesn't understand, it will just dump it in hex format, this is helpful since then we can use other tool such as tethereal to perform analysis when IPgrab doesn't understand it. There are many ways of using IPgrab yet to be discovered, however I think that's enough for now.
Cheers (:])
No comments:
Post a Comment