Since I will be offline in the coming three days, I would like to greet everybody Happy New Year!!!!!
To my family .....
To all my friends .....
To all the nerds in #myoss .....
To all the lamerz in #snort-gui .....
To all the guys and girls in #fluxbox, #FreeBSD and #OpenBSD .....
To everyone in the world .....
World in peace (:])
Special thanks to hanashi, richard, qru, tenner, kaeru and those I haven't mentionned, you guys have been great and I learn a lot from you guys throughout the year.
Cy4 N3xt Y34R ----->>>>>
Friday, December 30, 2005
Opera Web Browser - Flash plugin
If you are using OpenBSD desktop, and you are bugging that there's no flash plugin available for Firefox, you may consider installing Opera browser from ports. The flash plugin is available via port as well and you just have to install it. Once finish the installation from ports, just launch the shiny Opera Web Browser and loading the page with flash animation, everything is working fine and you should be happy user of Opera since it is really fast. If anyone can get flash plugin working on firefox, please leave comment and pointing out, I would like to know the trick.
I have Open Office 2.0 working on OpenBSD 3.8 box as well, will blog it soon.
Enjoy!!!!!
Enjoy!!!!!
Thursday, December 29, 2005
Bond interface for OpenBSD
You may have heard about bonding interface in linux that allows you to bind multiple network interfaces together into a single channel. Channel bonding enables two or more network interfaces to act as one, simultaneously increasing the bandwidth and providing redundancy. So if you are connecting your IDS sensor to the network tap, bonding interface is what you need since most of the expensive tap splits the stream into two, transmit and receive. You may find how to configure bond interface on RHEL/CentOS in InstantNSM documentation, or if your OS preference is FreeBSD, you may find the guide in taosecurity site.
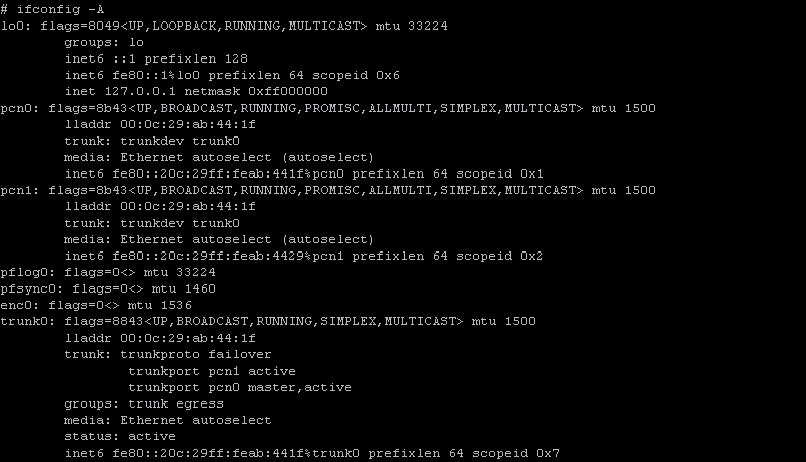
How about OpenBSD? OpenBSD has introduced trunk interface in 3.8 release, and if you are always staying with Current or maybe you are always edging, you will notice they have even added failover capabilities for trunk interface, what is trunk interface anyway?
Trunk allows aggregation of multiple network interfaces as one virtual inteface. All the network interfaces that configured to be single trunk will receive traffic from all attached ports. Ain't it similar to bond interface? I downloaded the latest OpenBSD and try to configure trunk interface, apparently it works and this is quick view of trunk interface. Serving as IDS sensor interface, we don't need to assign the IP address to the trunk interface which only used to sniff traffic in promisc mode as IDS sensor. It is not mentionned in the trunk man page however you can configure trunk interface without assiging IP address, thanks to Richard who asking me to try it out.
I have two network interfaces which are pcn0 and pcn1. In order to create trunk0, that's what I do
shell>ifconfig trunk0 trunkport pcn0 up
shell>ifconfig trunk0 trunkport pcn1 up
shell>ifconfig trunk0 trunkproto failover up
Here's the output, you may noteice pcn0, pcn1 and trunk0 are sharing the same mac address now, lladdr means mac address has been changed. However you should figure out their original mac address in the inet6 field. The default proto of the trunk interface is roundrobin, and even if you configure to use proto failover, it won't go failover unless one of the interface down. Proto here doesnt means IP or TCP protocol but the mechanism that used to trunk.
 The detail configurationof trunk.
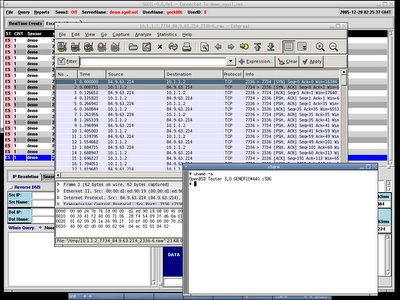
 You may see clearly here that the streams are load balanced within pcn0 and pcn1 and trunk0 is receiving everything - link aggregation :]
 If I run ifconfig trunk0 -trunkport pcn0, then pcn1 is still alive and receiving everything. The failover seems working well.
That's what we need for the OpenBSD IDS sensor box - trunk interface corresponding to the linux bond interface.
Wednesday, December 28, 2005
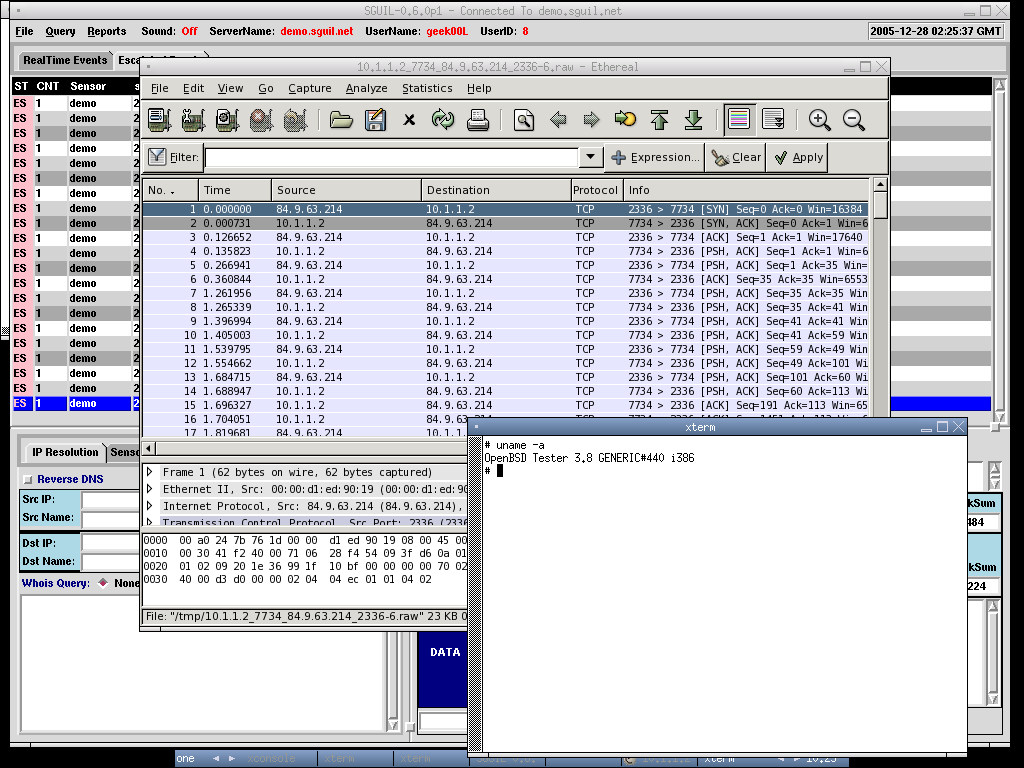
Sguil Client On OpenBSD-3.8
I have tested and updated the Sguil client installation script and now it works on OpenBSD-3.8, nothing much I have changed but it works perfectly now. I have uploaded it here.
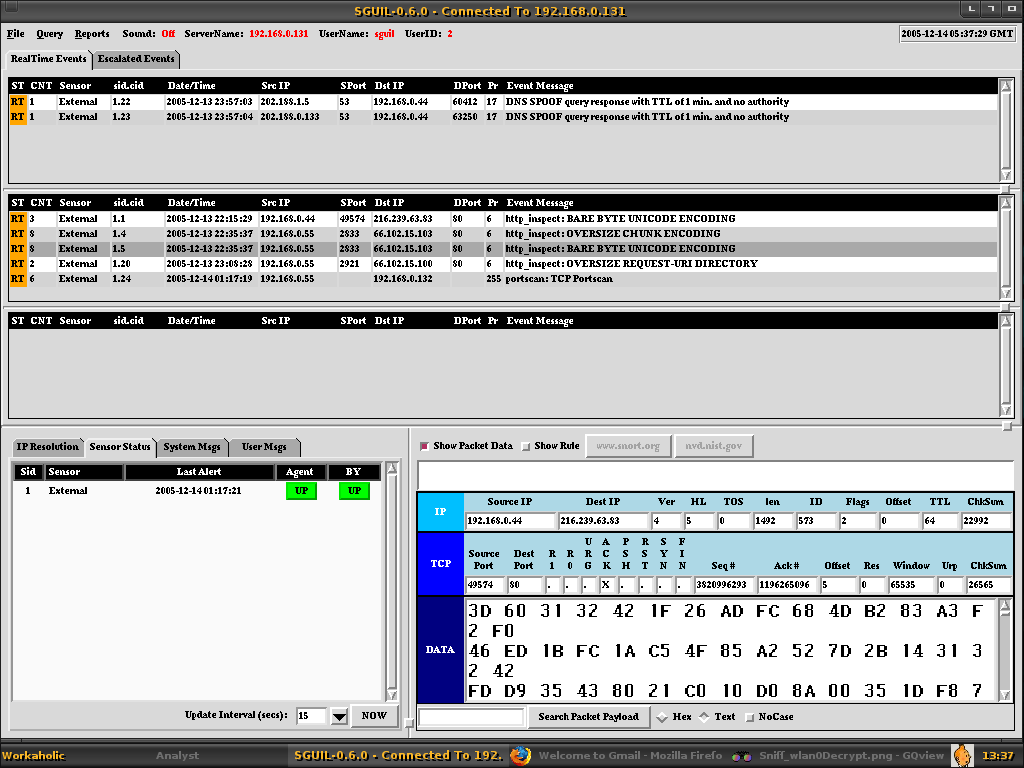
Here are the screenshots of my Sguil Analyzt Console on OpenBSD-3.8.

Here are the screenshots of my Sguil Analyzt Console on OpenBSD-3.8.
Ethereal On OpenBSD-3.8
I'm sure most of you miss Ethereal on OpenBSD since it has been dropped out from package/port for the reason of being insecure, however since it is a must tool for network analyzt, we still prefer to keep it in our pocket. But the problem is many people keep getting problems and errors while compiling Ethereal from source.
I'm fortunately enough to get to this url when googling which providing instructions of compiling Ethereal under OpenBSD, apparently it is not too hard. I have tested it under OpenBSD current and have little correction on that installation guide.
For quick setup, I install OpenBSD using latest snapshot, and use the package here since this is rather easy and fast to build system.
Before you run autogen.sh, you will have to export autconf and automake version. You can make sure of it's version with ls /usr/local/bin/ | grep autoconf and automake, you should be seeing the version that has been installed, then we export it with the commands below.
shell>export AUTOCONF_VERSION=2.59
shell>export AUTOMAKE_VERSION=1.9
shell>./autogen.sh
shell>./configure && gmake && gmake install
Make sure you have all the softwares installed before installing Ethereal, else you will be getting errors and won't be able to compile successfully.
Here's the screenshot (:])
Monday, December 26, 2005
Wget saves the day .....
Today I'm having intermittent connection, again thanks to my ISP, I'm downloading OpenBSD snapshot since I need the latest OpenBSD to try out network interface trunking. It shouldn't be too hard to download by using wget and creating iso for the snapshot.
shell>mkdir -p /nsm/OpenBSD/snapshots/i386
shell>cd /nsm/OpenBSD/snapshots/i386
shell>wget ftp://ftp.openbsd.org/pub/OpenBSD/snapshots/i386/*
Bang!!! Again my internet connection stucked and stop working, if I have used the ftp client that comes with OpenBSD, I'm totally screw out and have to redownload it, fortunately with wget, I can just resume it with
shell>wget -c ftp://ftp.openbsd.org/pub/OpenBSD/snapshots/i386/*

Now the download resumes and I able to continue on it without problem. If the connection goes wrong again, I will be able to resume again with the same command. After the snapshot has been downloaded, I just need to run the commands below to create the iso for it.
shell> cd /nsm
shell>mkhybrid -r -b snapshots/i386/cdrom38.fs -c "boot.catalog" -o OpenBSD_20051226.iso OpenBSD
I prefer to put a date to keep track of iso I created because snapshot updates frequently. By now you should already have the OpenBSD_20051226.iso and you can burn it to CD using any kind of Operating Systems.
Ain't it easy to create OpenBSD iso :]
OpenBSD Sguil
I have uploaded my old Sguil Installation on OpenBSD to this location, it is based on Sguil-0.5.3 and I'm currently updating it to Sguil-0.6p1, however there are few things that I haven't figured out since there are lots of changes from 0.5.3 to 0.6. The sguil client script that I have uploaded is based on the script in sguil.sourceforge.net, however well tested on OpenBSD-3.6 since the one available in the sguil site is old, I'm currently updating it as well to fit in OpenBSD-3.8. Hopefully it may help people who want to get a start on Sguil using OpenBSD platform.
Sunday, December 25, 2005
~Merry Christmas to Eveybody~
Merry Christmas to everyone in the world, especially my family and all the OSS folks, you guys have been great and to all the geeks, get a life and stop being nerd, new year is around the corner as well and hopefully everyone is in delighting mood.
Again I wish the world in peace, we love no war :]
Santa Claus : Joy to the world ..............................................
Again I wish the world in peace, we love no war :]
Santa Claus : Joy to the world ..............................................
Friday, December 23, 2005
Must Read - For G33K
My collegue has sent me this url, and it is one of the most enjoyable read. It seems the trend is changing and now geek is considered a lovable type and adorable.
Rethink about yourself now (:])
Rethink about yourself now (:])
Thursday, December 22, 2005
Windows Sguil Client
Again I have put everything together, this time I upload the softwares needed to run Sguil client on Windows. If you are using Windows Operating System, and you would like to connect to the Sguil Demo Server, now thing becomes easy and straight forward.
Download all the softwares needed from here. Then just do the default installation for ActiveTcl and Ethereal. To have it supporting ssl, you need to unzip the tls file, then copy it to C:\tls\lib\ and define it's path in sguil.conf. Now you should unzip the sguil-client file, and you will see sguil.tk and sguil.conf under client directory. Edit the sguil.conf as below,
set TLS_PATH "c:/tcl/lib/tls1.5/tls15.dll"
set ETHEREAL_PATH "c:/progra~1/Ethereal/ethereal.exe"
set ETHEREAL_STORE_DIR "c:/tmp"
set BROWSER_PATH "c:/progra~1/Mozilla Firefox/firefox.exe"
To avoid version mismatch error when connecting to Sguil Demo Server, just edit it in sguil.tk,
set VERSION "SGUIL-0.6.0"
By now you should be able to launch sguil.tk by using wish(tk) which is in bundled in Activetcl.
Wednesday, December 21, 2005
InstantNSM Components Repository
To ease the installation of InstantNSM, I have uploaded all the components that needed by InstantNSM to one central location so that people who want to test or implement InstantNSM don't have to download sources from different locations which is troublesome. I will add the md5 checksum or maybe sha checksum for the source once I have my time on it.
You can download InstantNSM component at this central location. Any changes or updates will be done following the InstantNSM build.
It's good to hear that Paul is working on the Sguil port/package on FreeBSD, and Hanashi has decided to build rpm for all the components, the implementation of NSM will be much more easier than before either on linux or bsd platform.
^Enjoy^
Monday, December 19, 2005
Virtual Machine Alternative
I have been using vmware since two years back, and getting used to it on either windows or linux platform especially the workstation edition. However for long I'm looking for the alternative which is oss base, I have been told by transporter(folk in freenode #snort-gui) that qemu is good, but I never give it a try until Kaeru(folk in freenode #myoss) told me that it is easy and fast enough when loaded with the accelerator. Thought that might be a good replacement for vmware if the perfomance good enough since Open Source virtual machine tend to be slower.
I have tried out qemu with accelerator loaded on freeBSD, with virtualization instead of emulation, I can see a perfomance boost and found a benchmarking site noted it's perfomance close to native, thanks to the Kaeru's qemu guide.
I'm still testing on it's networking features and perfomance of qemu, if everything goes fine, I bet I will no longer using vmware.
If I'm not forgotten, Richard [at] taosecurity.blogspot.com has mentionned that he prefers to create a vmware image for it's NSM build with vmplayer released, i think Qemu is good enough for that environment since it has almost the same functions and usabilities.
I have installed centos 4.2 on qemu, and preparing to setup instantNSM on it. If everything goes fine, I will offer the virtual machine image for downloading so that anyone can try out and have fun with NSM.
Qemu - We love OSS!!!!!
Friday, December 16, 2005
InstantNSM - Sensor Setup in a minute
If you are using InstantNSM for Sguil setup, everything becomes easy and handy. After you have proper setup of everything, and you want to add another sensor so that you can watch out another network segment, adding additional sensor for Sguil in one Box becoming painless process, just 3 steps will do.
1. Plug in add on Network Interface which will be configured as the sensor, for example eth2.
2. Download snort rules, untar it and copy all of them to /usr/local/snortrules-$SENSORNAME, ignore the doc directory since it is not used by sguil.
3. Run the InstantNSM script, it's Q & A base and everything will be brought up in minute.
 Just enter and configuration will be done automagically :P
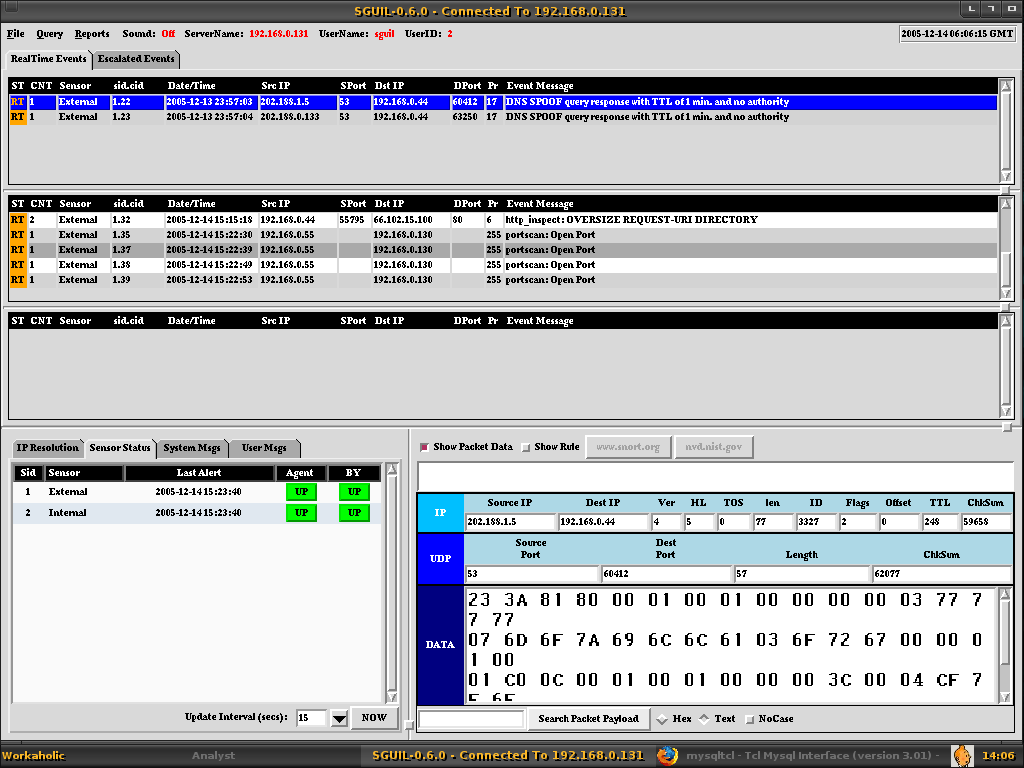 There you get your additional Sensor named Internal.
InstantNSM rocks!!!!!
Scapy - FreeBSD port
Joy to the FreeBSD users, scapy port is available now, you can check it here. From now on, you just need to pkg_add -r scapy and it is in, I haven't tried out yet, since my own scapy install is working fine, maybe I will try it soon on another FreeBSD box.
Thanks to garga for the port and now I would hope it is ported to OpenBSD as well.
Thanks to garga for the port and now I would hope it is ported to OpenBSD as well.
Thursday, December 15, 2005
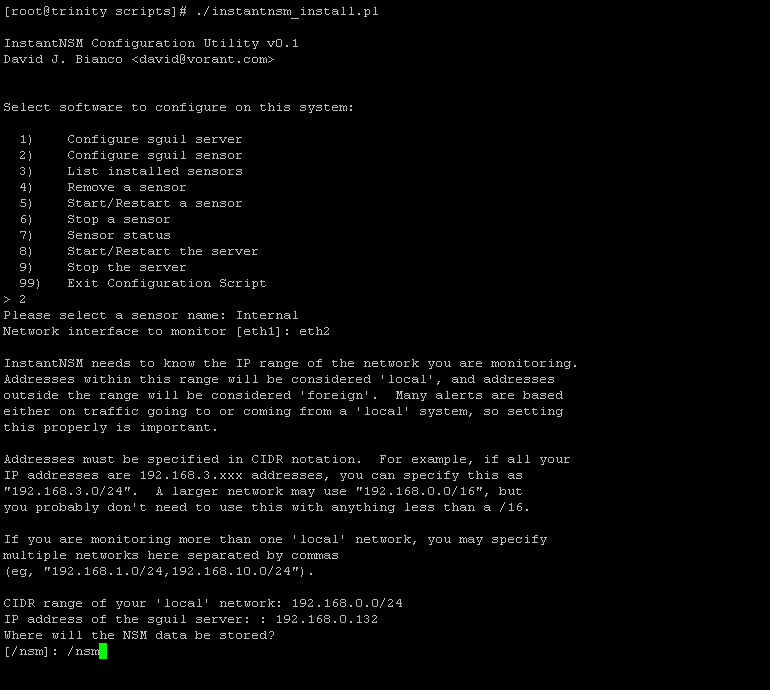
[-InstantNSM-]
I have blogged about InstantNSM previously, and finally testing it on Centos-4.2, after spending some times on it and with the help of Hanashi, I finally able to get Sguil up and running with InstantNSM script, the script allows you to have control of your Sguil Server and Sensor, and over the journey of InstantNSM, I have learnt how to build rpm package with source rpm as well, it is quick and easy. Since I need mysqltcl for Sguil server, and mysqltcl is not in the yum repository, I have to download the source rpm from it's site. There's version 3.01 and 2.51, I need the version 2.51 since 3.01 is incompatible with Sguil, after I downloaded it, I build the rpm with the rpmbuild,
shell>rpmbuild --rebuild mysqltcl-2.51.src.rpm
Thanks to Hanashi, and with that I have mysqltcl rpm package under /usr/src/redhat/RPMS/i386 directory. If you don't have rpmbuild, just yum install rpm-build will do.
Everyday is Learning Day :)
Below is the screenshot of my first InstantNSM build, I will add more sensors to see how things go.
Enjoy!!!!!
Nessus 3 Released
For people who haven't noticed, Nessus 3 is released, it moves to close source however it is still free, and for people who use Nessus 2, there are upgrades and improvements made for it, I will try on Nessus 3 since it would be fun to do so.
Wednesday, December 14, 2005
The Extra 4 Bytes?
One of my blog reader has recently sent me an email asking something regarding Scapy, the problem that he faced was: on every packet he sniffed with scapy, it has additional 4 bytes at the end of the packet and he didn't know why? That was happening when he tried to reinject 802.11 frames using an Atheros Card and the patched madwifi driver on Linux 2.4.31. However when sniffing with wlan0 which is using Prism based Card, there's no additional 4 bytes in the packet. So what could it be? This is the Scapy function he used,
sniff(iface="ath0raw", filter="ether dst 00:09:5b:12:3d:5b", count = 1)
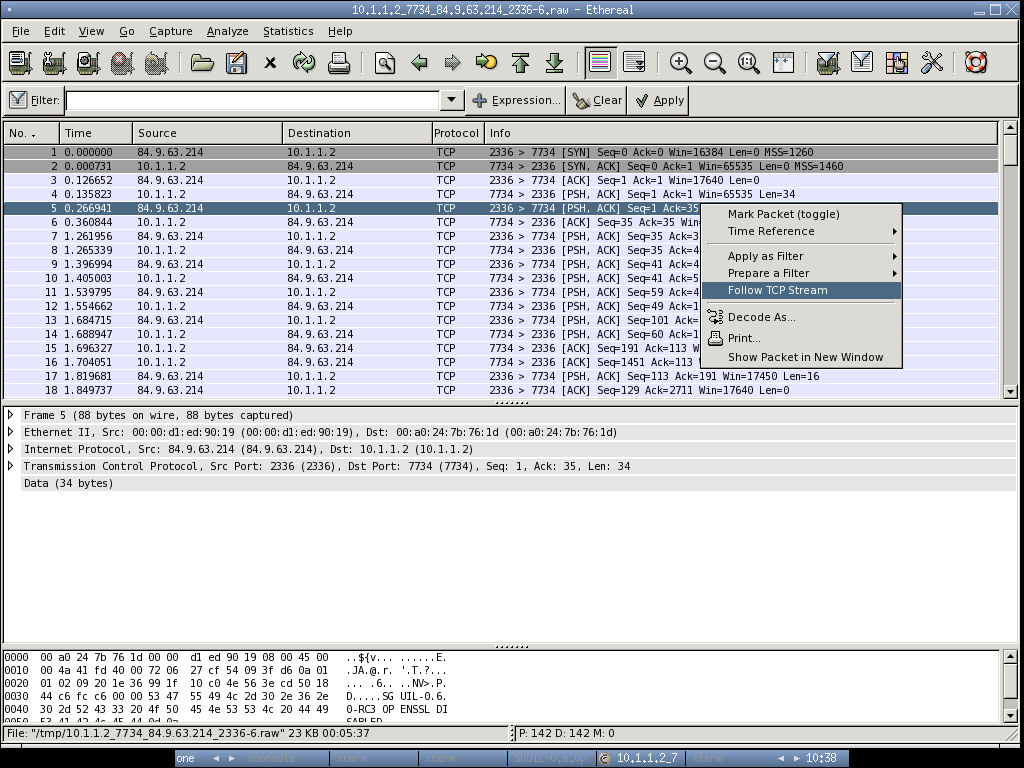
In order to resolve it, I decided to ask him to send me the pcap file so that I able to decode it. He sent me two files, sniff-ping-wlan0.cap and sniff-ping-ath0.cap. Once I got my hand free, I loaded these two files in ethereal and apparently one packet with the data of 92 bytes and another one with the data of 96 bytes.
sniff(iface="ath0raw", filter="ether dst 00:09:5b:12:3d:5b", count = 1)
In order to resolve it, I decided to ask him to send me the pcap file so that I able to decode it. He sent me two files, sniff-ping-wlan0.cap and sniff-ping-ath0.cap. Once I got my hand free, I loaded these two files in ethereal and apparently one packet with the data of 92 bytes and another one with the data of 96 bytes.
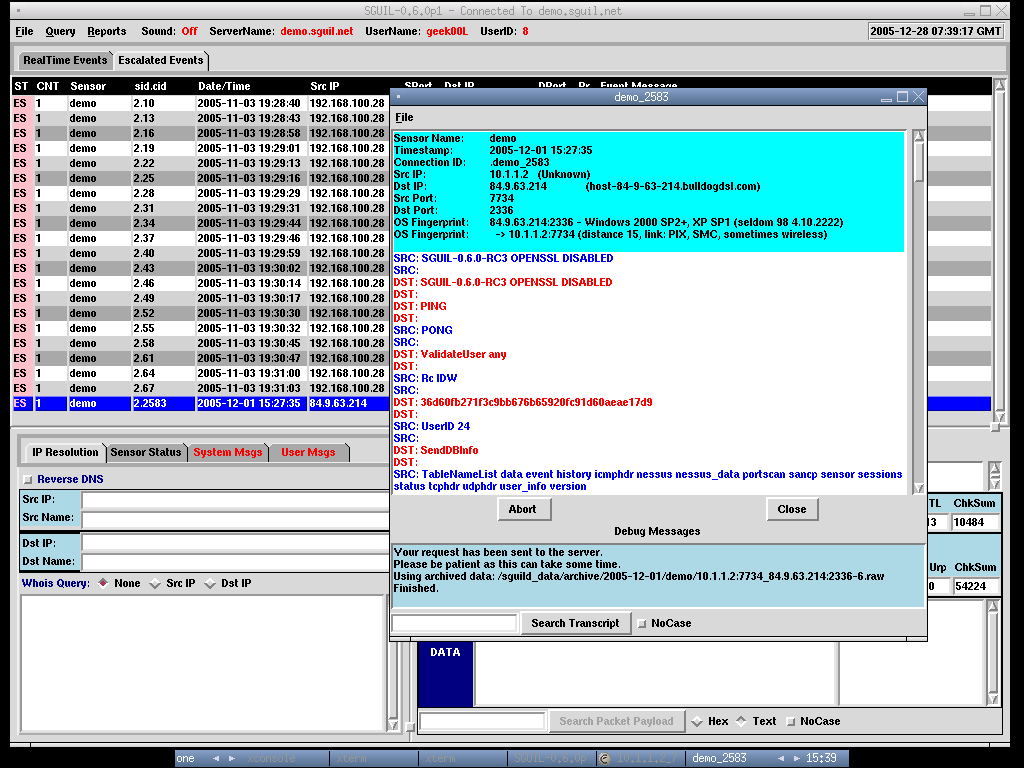
 This is sniff-ping-wlan0.cap
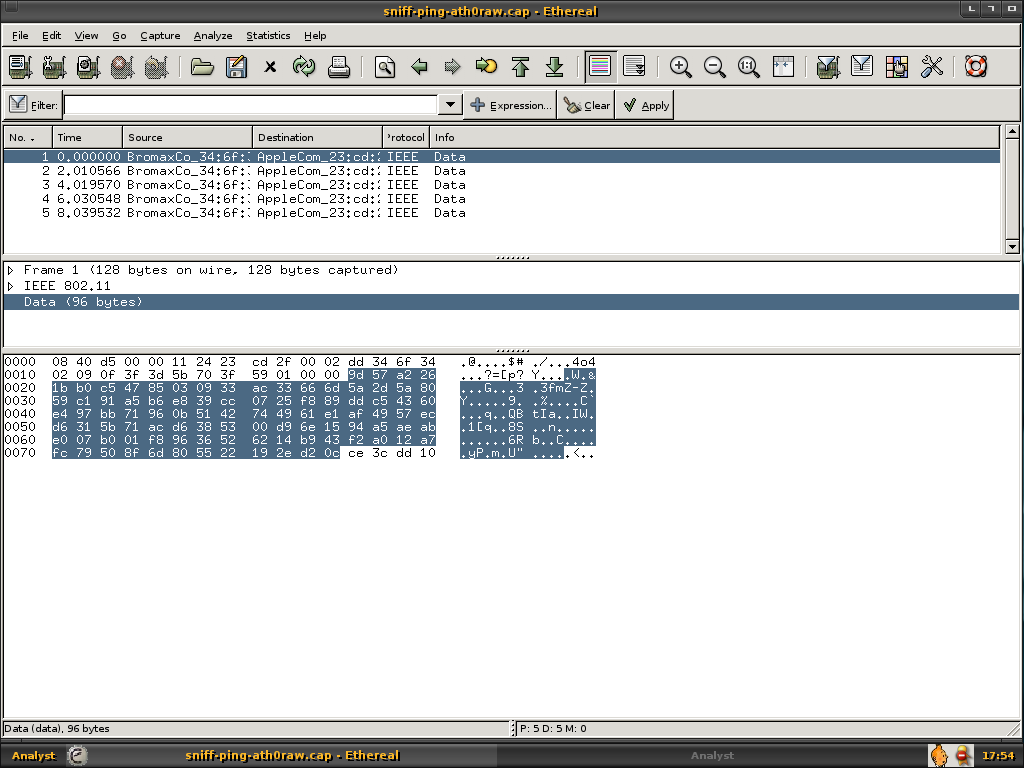 This is sniff-ping-ath0.cap with additional 4 bytes.
The packet itself is WEP enabled, I can't do much and decide to browse through the packet header and one thing caught my eye -ICV, ICV is 32 bits integrity check value, it is a checksum value that the receiving host calculates and compares to the one sent by the sending station to avoid tampering of frame integrity. It's weird that ath0 and wlan0 has the same packet with different ICV.


I asked my reader to send me the WEP key since I can't decrypt the single WEP enabled packet. He sent me the key which is AABBCCDDEE. With the WEP key, everything becomes easy, if you are using ethereal for daily task, you should know ethereal able to decrypt the WEP packet with the WEP key supplied. I launched my ethereal directly, to decrpyt WEP you can either shift + ctrl + p or go to Edit -> Preferences,
Go to Protocols -> IEEE 802.11
Check on Assume packets have FCS, WEP key count = 1 since only one WEP key is supplied and used. I decide to go with fcs disabled for wlan0, I'm just go for quick guess because most properly the additional 4 bytes is at the trailer and wlan0 without additional 4 bytes maybe without FCS in the packet.

 For ath0 packet, I checked on FCS, to try out my luck.
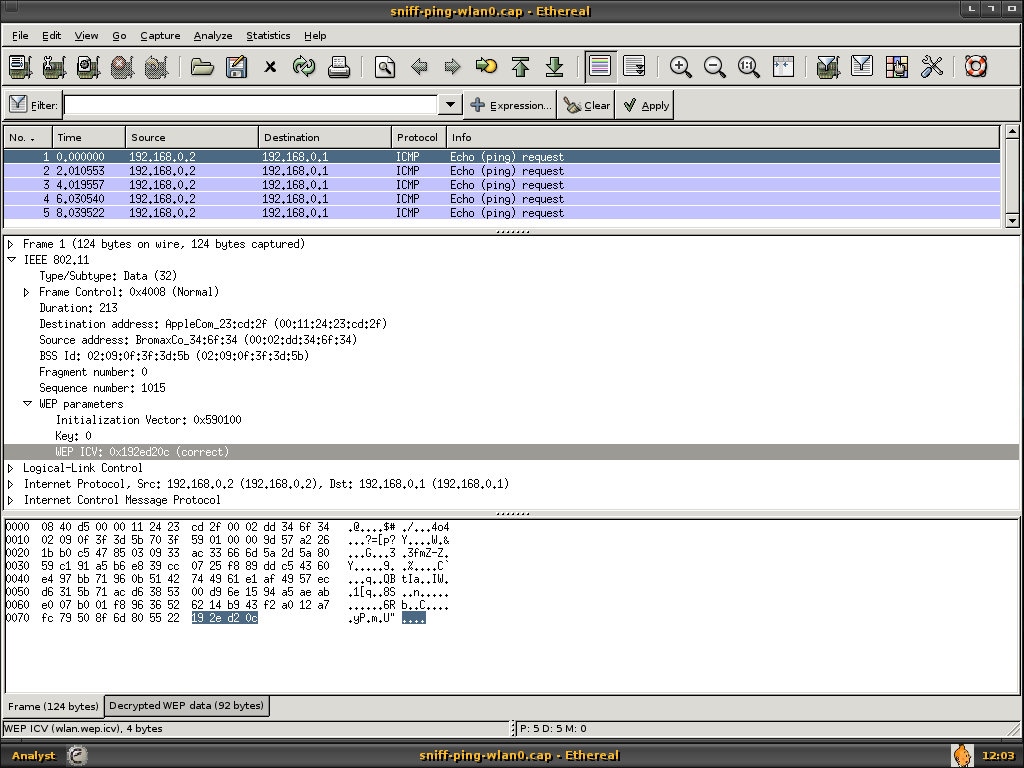

Both packet has the same WEP ICV, it is clear that the additional 4 bytes(ce3dcc10) is Frame Check Sequence.
Have fun with Ethereal (:])
Have fun with Ethereal (:])
Tuesday, December 13, 2005
Post Office - Out Of Service
Yesterday I went to the post office to pay bills, however when I reach the front door, they put up a sign board with the cool excuse - "Post Office closed, computer spoilt!" and it was Monday 2pm. I'm kind of feeling "WTF" seeing all the employees in the Post Office inside chit-chating there and not working.
Can you tell me what kind of Post Office System is this, it sounds really ridiculous to have all the computers spoilt at the same time and there's no backup, this is not only causing total loss of the people who come and pay for bill or mailing, but where is the reputation of Malaysia Post Office anyway?
I'm pissed, nobody can accept this excuse, so do I.
Saturday, December 10, 2005
Ethereal - Exploited Again!!!!!
One of my favourite analyst tool - Ethereal, get exploited again!
If you are using ethereal or Sguil in one box, most properly you need to patch your ethereal, don't get your box 0wned. Check out the link here.
You can find the source patch link and workaround there, cheers (:])
If you are using ethereal or Sguil in one box, most properly you need to patch your ethereal, don't get your box 0wned. Check out the link here.
You can find the source patch link and workaround there, cheers (:])
Helix 1.7 Released
I have posted a request in the Helix forum for the upgrade of PyFLAG, the latest PyFLAG which is version 0.78 has a new function called Network Forensic. Now you can load your pcap file into PyFLAG web interface, and access to the packet content to perform Network Forensic. Hereby I have posted the screenshots of Helix 1.7 and PyFLAG-0.78, I have downloaded the pcap file from taosecurity.blogspot.com and load it to the PyFLAG for packet navigation.
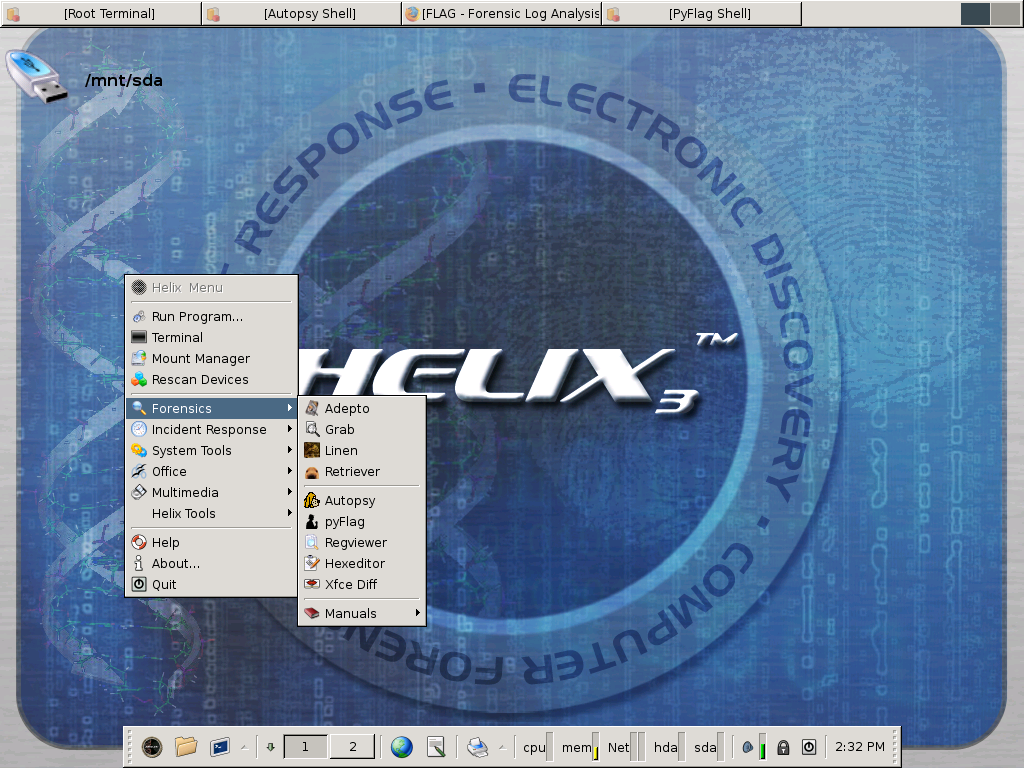 The new and shiny Helix :]
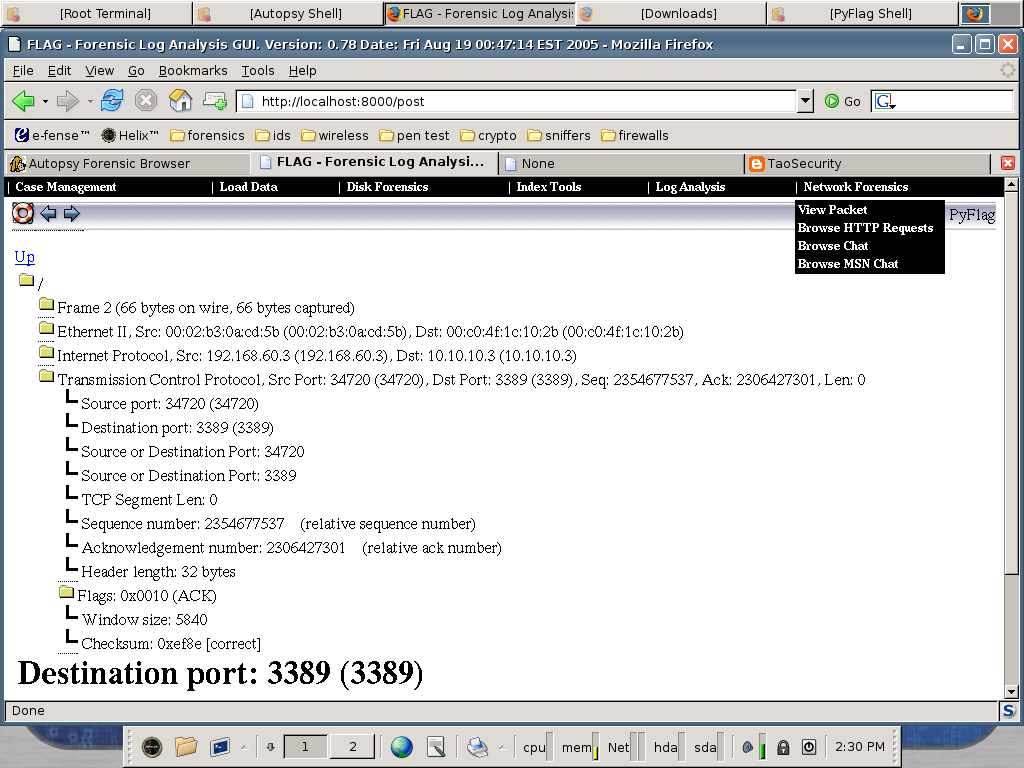 This is PyFLAG in Helix, loading single packet content in it's web gui. There are functions like Browse HTTP request and etc to ease your work.
The only thing I feel dissapointed about Helix is that Sguil client no longer available, but maybe that's the purpose of Helix, which is Forensic Centric, however one should know you may able to perform Network Forensic with Sguil.
Sguil - InstantNSM
It was a real pain to go through the whole process of Sguil installation and configuration, and do I say it WAS, Hanashi, one of Sguil dedicated member, has created InstantNSM to put everything together. You no longer need to install everything by hand manually. So what is InstantNSM anyway.
InstantNSM simplifys Sguil deployment by providing pre-tested software components, and by automating common adminstrative tasks. With InstantNSM, Sguil deployment will be nearly a turnkey solution. This is stated in the project page.
Isn't this is what we need as security administrator, not dealing with all the hassles of setting it up, but more concentrating on security and vulnerability control plus incident handling. If you plan to try out Sguil, give InstantNSM a try and visit irc.freenode.net #snort-gui irc channel if you have problem.
Thursday, December 08, 2005
GUI Password Manager
If you are system administrator, or maybe network administrator, most of the times you will be sticking to multiple servers no matter they are windows, *nixes variants or cisco router. I bet no one will remember all the pasword/passphrase even you have very good memorizing power. A good password manager may ease your work, there are not much alternatives for *nixes system. Normally I use these two password managers that available in freebsd packages/ports - Gpasman and Figaro's Password Manger(fpm). I prefer Gpasman for it's simplicity and Figaro for it's scriptable ability.
Maybe the only thing you worry is that once your password storage files get stolen, you will be in trouble however since the file itself is encrypted, it may take times for the bad guy to reveal the password, and you should have enough time to change your password at that moment.
Below are the screenshots of these two passoword managers, you may spot the differences.
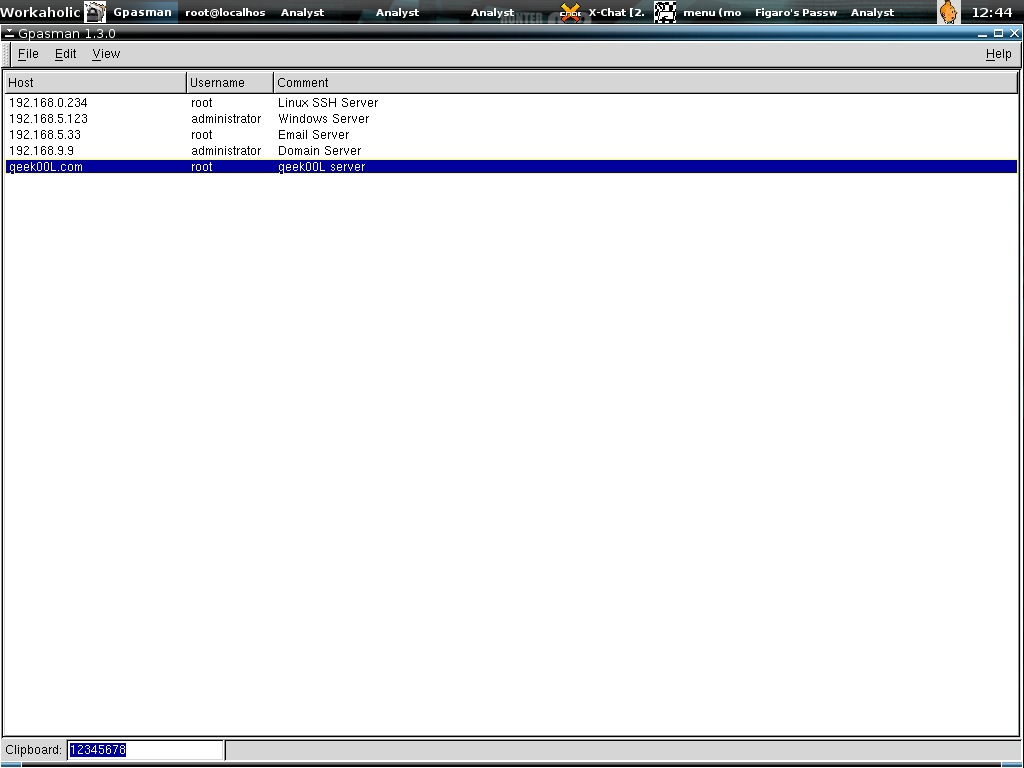 Gpasman offers simple gui,
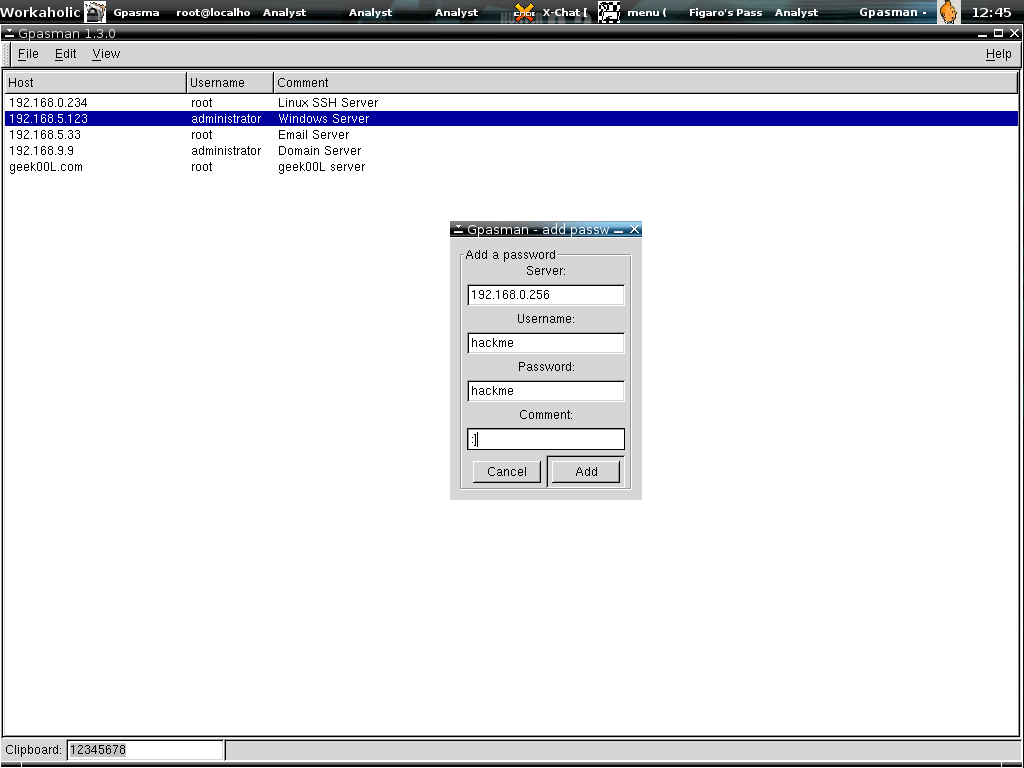 And simple configuration of course.
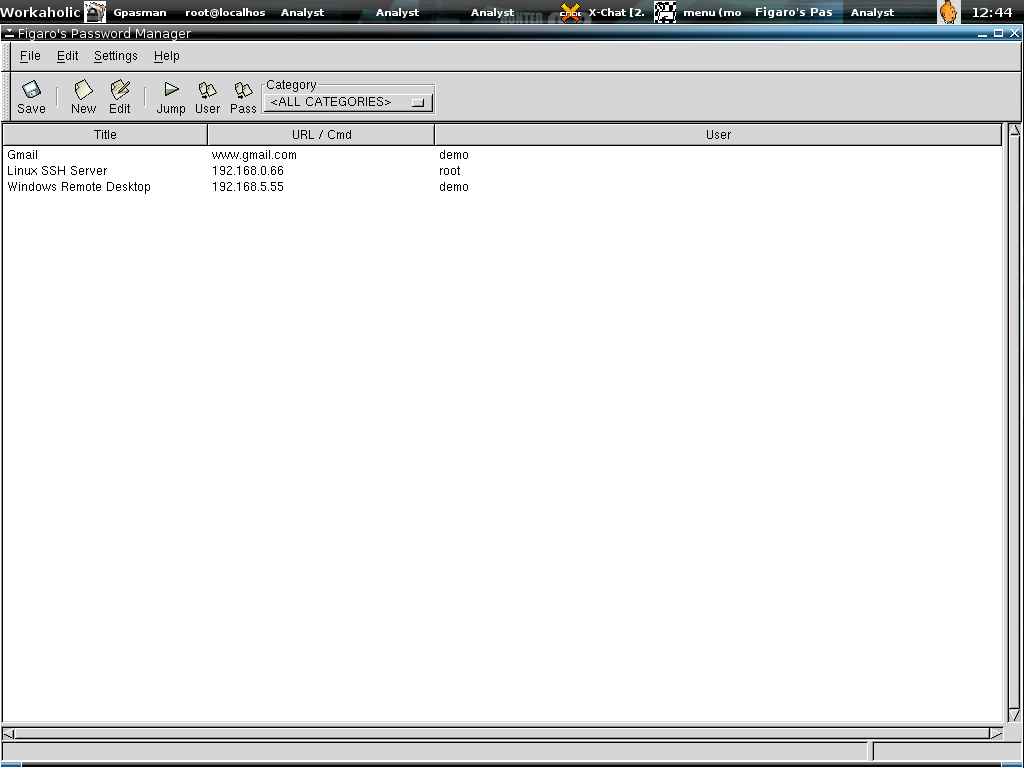 Figaro offers simple gui too, however it allows you to define launcher,
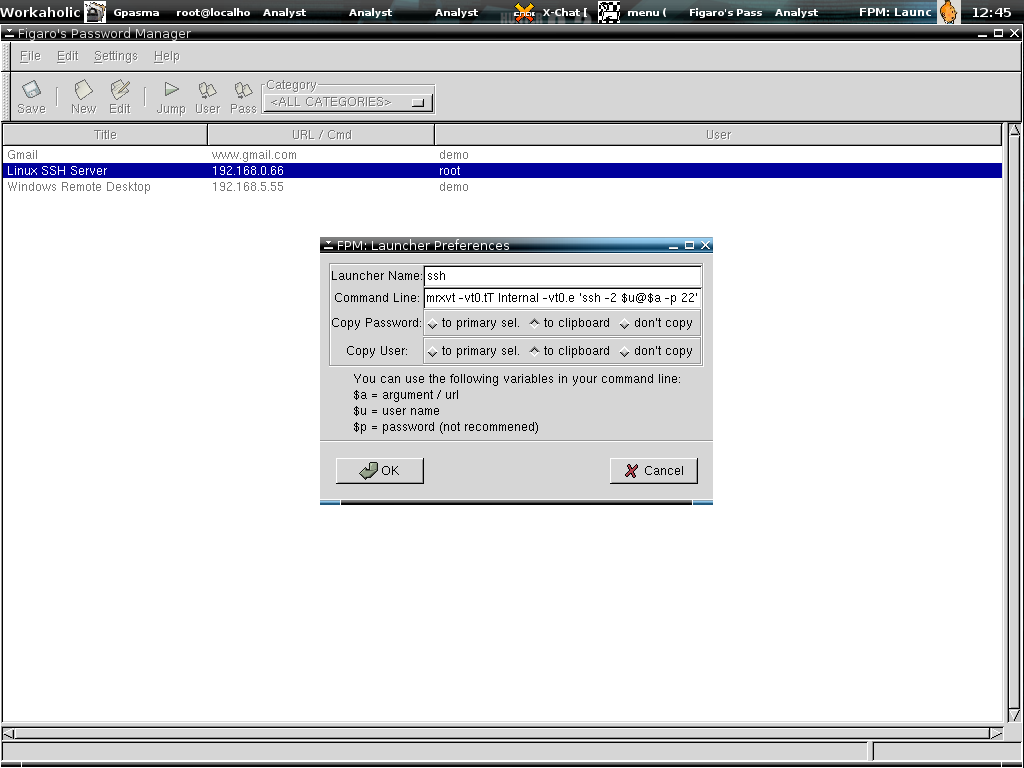 Which is more flexible, and the if you click on the jump button, directly you execute the command and login to the servers.
Eventhough Gpasman is easier, however you have to copy the password to clipboard manually and insert to the program you use. One best part about these two programs is that when you plan to rebuild your system and lazy to reconfigure it again, just copy out the file .gpasman and .fpm directory, place it back to the user directory once you have the new system setup, so it is configured once, use it everywhere, that might help other system administrators who has same system login database as well.
I think Gpasman developement has stopped while figaro is still under active developement. However both are worth to at least give it a try.
Wednesday, December 07, 2005
GHH - Tracking Web Based Worm
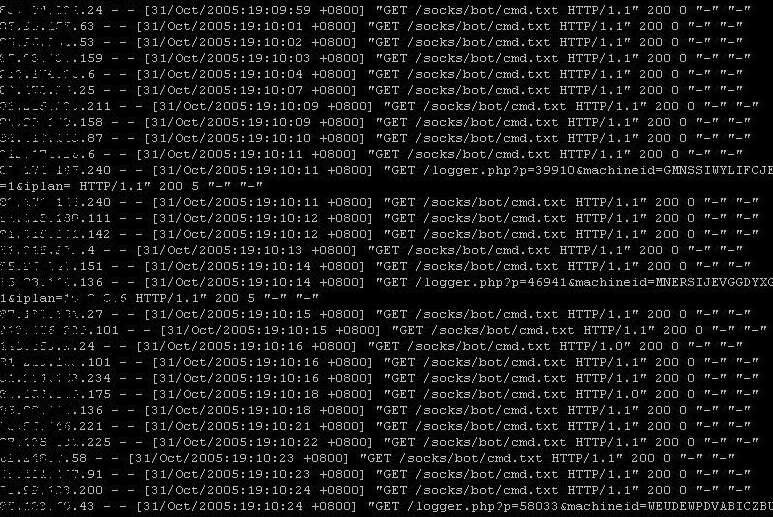
Just right after I blog about honeyd, I read about Mambo bot, myspace worm was a shock and now more and more Web Based Worm merging, this could indicate that next generation worm not only targetting users anymore but vulnerable server, this is not a good sign because there are many users out there deploying cms such as phpbb, mambo and etc without maintaining it and tracking the latest version which fixing vulnerabilities.
There are ways to track the Mambo bot, since it search for other vulnerable servers through google search engine. GHH- Google Hack Honeypot is one of the possible way to track Mambo Bot. Maybe I should spend sometimes on Google Hack Honeypot Deployment when I have enough time. Check it out if you feel interested.
There are ways to track the Mambo bot, since it search for other vulnerable servers through google search engine. GHH- Google Hack Honeypot is one of the possible way to track Mambo Bot. Maybe I should spend sometimes on Google Hack Honeypot Deployment when I have enough time. Check it out if you feel interested.
Monday, December 05, 2005
Honeyd - Revisited
That was two years back when I started using honeyd for my own research and stop after version 0.8, it's time to revisit the honeyd since v1.0 sounds mature enough :], and I would like to see the differences of it compared to previous version. The obvious changes would be arpd no longer needed and dhcp is supported, honeyd has it's own management console and even though it's not in mature stage, however it would be kind of useful especially you can easily troubleshoot your setup with it. Hereby I will demonstrate a simple setup of honeyd on OpenBSD, and testing it using Scapy and Nmap.
First add this two line in your /root/.profile
PKG_PATH=ftp://ftp.openbsd.org/pub/OpenBSD/3.8/packages/i386/
export PKG_PATH
Installing Honeyd package
shell>pkg_add ${PKG_PATH}honeyd-1.0p0.tgz
The installation itself will create a user _honeyd since it's not wise to run honeyd as root. Now you need to create two logs for the user _honeyd.
shell>cd /var/log
shell>touch honeyd.log honeyd_service.log; chown -R _honeyd:_honeyd honeyd.log honeyd_service.log
You can start the configuration of honeyd by now, I just configure a simple one that consists of two windows 2000 advanced servers and one cisco router. Below is my /etc/honeyd.conf file.
###################################
create windows
set windows personality "Microsoft Windows NT 4.0 Server SP5-SP6"
#set windows uptime 123456
set windows maxfds 35
add windows tcp port 80 "sh /usr/local/share/honeyd/scripts/web.sh"
add windows tcp port 139 open
add windows tcp port 137 open
add windows udp port 137 open
add windows udp port 135 open
set windows default tcp action reset
set windows default udp action reset
#dhcp windows on pcn0 ethernet "3com"
set windows ethernet "3com"
bind 192.168.0.135 windows
bind 192.168.0.136 windows
create router
set router personality "Cisco 1601R router running IOS 12.1(5)"
set router default tcp action reset
add router tcp port 22 "/usr/local/share/honeyd/scripts/test.sh"
add router tcp port 23 "/usr/local/share/honeyd/scripts/router-telnet.pl"
set router ethernet "cisco"
bind 192.168.0.160 router
####################################
One of the thing worth to be mentionned is that you are now able to spoof the MAC address of the certain vendors like cisco, 3com and etc. This is rather good to avoid the detection of virtual honeypot since most properly Cisco Router would use their own Cisco NIC. Take note of the bold line above.
We can now start running honeyd by using the commands in the screenshot. By using honeydctl(honeyd management console), we can list out our virtual honeypots, 192.168.0.135 and 192.168.0.136 are my simulated windows servers and 192.168.0.160 is my simulated cisco router.

To test against whether the honeyd is setup properly, I launch up Scapy, using arping and nmap_fp to fingerprint it.
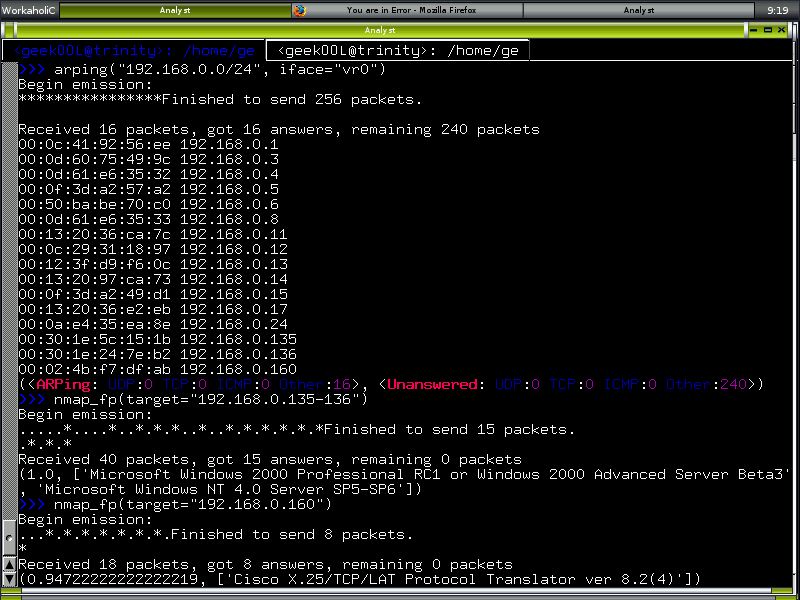
Apparently the result is matching my setup, let's see how about running testing by using native Nmap. There are two screenshots below, the first one is running nmap against Windows box and the second one is against the Cisco router.

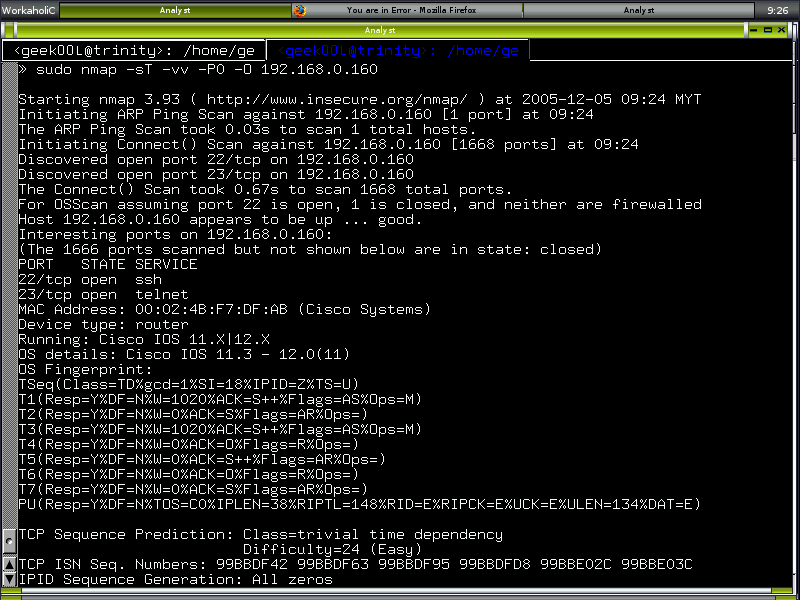
If you look at it closely, you might see the Mac Address belongs to the vendors I specified in the honeyd config file, windows box using 3com Nic and Cisco router using it's own NIC :]
To monitor who is connecting to the virtual honeypot in real time.
shell>tail -f /var/log/honeyd.log
To stop all the honeyd process.
shell>kill -9 `pgrep honeyd`
We have seen improvment in honeyd so far, and what I noticed in the TODO file from the honeyd source tarball is that some simulated operating system don't support defragmentation, maybe OpenBSD PF scrub function might do the trick for it, and I can't wait for the function of start, shutdown and reboot simulated OS by using honeyd management console.
Honeyd becomes least popular for honeypot setup in the real world and the one that take over would be the next generation honeypot such as mwcollect and nepenthes. Both are more close to the malware collection honeypot. Honeyd simulating the OS level is not attractive enough for the malicious users nowadays, on the other hand mwcollect and nepenthes simulating the vulnerable applications would be more attrative to the bad guy.
Enjoy.
Sunday, December 04, 2005
Mydefcon.org
I decide to write about windows security stuffs for mydefcon.org since I want my blog to be more *nixes centric, so you may check it out there. The first write up is Windows Incident Response tips since I'm always emphasizing on defensive security related stuffs. Hopefully I able to steal some times to write more.
If you are in Penang, feel free to join the mydefcon monthly meetup and banging with those nerds there.
Saturday, December 03, 2005
Updates
For people who use IDS, this is one of the enjoyable article - Evading NIDS, revisited.
For people who use Sguil, Sguil-0.6.0 is out, check out the sguil demo if you don't know what it offers.
I'm working on dissectible.org contents and might be having it up as soon as possible.
For people who use Sguil, Sguil-0.6.0 is out, check out the sguil demo if you don't know what it offers.
I'm working on dissectible.org contents and might be having it up as soon as possible.
Friday, December 02, 2005
IPv6 - The Practical
For people who want a free IPv6 address space, you can go for the IPv6 tunnel broker, this is one of my preferred tunnel broker - BT Exact. What I really like is that it cooks well with my DSL connection of which detecting the changes of my dynamic IP and notify me, hence it's FREE with term and conditions.
However here I will show IPv6 in LAN and the usage of IPv6. Let's acknowledge myself not a expert of IPv6 and currently trying to understand it, so what's make IPv6 difference than IPv4?
IPv6
1. 128 bits address
2. Address is presented in 32 Hex numbers
3. No broadcast, instead utilize multicast
4. Security Oriented
5. Eliminate classful
There are more to mentionned, however here's the few points I want to make, when IPv4 was invented, they are not considering security as an issue, instead they are more concentrating on network issue. Nobody ever think of IPv4 address space will be exhausted that fast since 2^32 is a huge number.
Now I will show ping6 in IPv6 LAN, the ping for IPv6. Clearly enough making use of IPv6 is fun since ssh, apache, dns and all those services that are protocol independent working well in the IPv6 Environment.

Since it's in the LAN, so we are most likely tinkering with IPv6 over ethernet, so normally you will be able to query or connecting to link-local address. The link-local address of lnc0 is fe80::20c::29ff:fe81:c986, you might notice the %lnc0 behind it, it indicates the scope-id. You will have to specify scope-id as well while using ping6 in the LAN or site-local address, this is not neccesary when you are trying to ping IPv6 glocal address.
Scope-id is the interface index for the interface to which the link-local address is assigned. Link-local address starts with the prefix of fe80, and the suffix(last 64bits) or we call it interface identifier is using MAC address. However since MAC address is only 48 bits, it splits into two part, the oui of MAC address(first three octets) becomes the company id, the fourth and fifth octets of the are set to the fixed value FFFE hexadecimal, and the last three octets is added behind it. So you might see MAC address of 00:0c:29:81:c9:86 to be 20c:29ff:fe81:c986, remember 0 is always been suppressed.
Ping6 is good in diagnosing IPv6 problem, you might see I'm pinging ff02::1, for who are not familiar with IPv6, ff02::1 is the link-local all-node multicast address, it will reach every node in the network link, doesn't it sounds like broadcast :]
You might see the result indicate there's a duplicate packets, this is normal when you are doing multicasting since all of the nodes replying to same request, however if you have duplicated packets when doing unicast, there's something wrong with your hardware or misconfiguration.
You will also see I unable to ping and getting error message of udp connect: network is unreacheable when I'm not pinging with scope-id.
Ping6 -f is a flooding ping and it requires root priviledge to run, I just putting it here for fun.
For people who curious how a single node discovers the other nodes in the ethernet network with the command of ping6 -W ff02::1, it is actually sending a packet with ICMPv6 Node Information Query(type 139 Code 0), all other nodes that receving the Node Information Query will reply with the packet of ICMPv6 Node Information Reply(type 140 Code 0) together with the dns label(hostname) such as trinity.
There are more to learn about IPv6, however one should learn IPv4 before learning IPv6 since foundation is the most important thing. Learning new stuff is always fun.
My ip is ::1, don't hack me :P
Thursday, December 01, 2005
Fluxbox on OpenBSD 3.8
Xorg Setup
shell>Xorg -configure
This command will automatically detect your hardware specification and generate the xorg.conf.new as a template under your user home directory.
You can test your xorg.conf by using the command below
shell>Xorg -config /root/xorg.conf.new
Once you have proper xorg.conf.new under your user home directory, copy it to the /etc/X11
shell>cp xorg.conf.new /etc/X11/xorg.conf
Now you are done with Xorg.
If you want to use xdm instead of gdm, normally you can just
shell>echo "xdm_flags=\"\"" > /etc/rc.conf.local
Fluxbox Setup
Before you install, you should add this two lines to your ~/.profile
PKG_PATH=ftp://ftp.openbsd.org/pub/OpenBSD/3.8/packages/i386/
export PKG_PATH
Now you won't need to export the package path manually everytime you login to the machine.
Installing fluxbox
You can either use port or package install.
Port Install
shell>cd /usr/ports/x11/fluxbox; make install
Package Install
shell>pkg_add ${PKG_PATH}fluxbox-0.9.13.tgz
Fluxbox Configuration
If you plan to go for startx manually, you can just create .xinitrc under user home directory
shell>cd ~
shell>echo "exec /usr/local/bin/startfluxbox" > .xinitrc
shell>chmod u+x .xinitrc
Or if you are using xdm/gdm as a wrapper to launch startx, you should use .xsession
shell>echo "exec /usr/local/bin/startfluxbox" > .xsession
I suggest you copy all the files under /usr/local/share/fluxbox to you user home directory.
shell>cp -fR /usr/local/share/fluxbox/* ~/.fluxbox/
GDM Setup
If you prefer to use GDM - gnome display manager instead of xdm for it's nicer and rocking interface, let's go get it.
Port Install
shell>cd /usr/ports/x11/gnome/gdm; make install
Package Install
shell>pkg_add ${PKG_PATH}gdm-2.6.0.9.tgz
After the installation, edit the /etc/rc and change the part below. Or if you are good in sed, you may be able to do it quicky with s/xdm/gdm/g
# Alternatively, on some architectures, xdm may be started in /etc/ttys.
if [ "X${xdm_flags}" != X"NO" ]; then
echo 'starting xdm...'; /usr/X11R6/bin/xdm ${xdm_flags}
fi
to
# Alternatively, on some architectures, xdm may be started in /etc/ttys.
if [ "X${gdm_flags}" != X"NO" ]; then
echo 'starting gdm...'; /usr/local/bin/gdm ${gdm_flags}
fi
Then, change the xdm_flags="" in /etc/rc.conf.local to gdm_flags=""
By now, you should be done :]
Wednesday, November 30, 2005
Scapy - Better Traceroute?
Traceroute is kinda useful when troubleshooting network, and one of the function that you have in Scapy is Traceroute, the traditional traceroute which make use of icmp and udp or maybe dns no longer effective or accurate these days. Traceroute in Scapy by default uses tcp, this is more close to the current world implementation when more and more ISP discard or block icmp or udp by default. However you can actually use traceroute -P tcp to achive the same thing. Another reason why I like about Scapy's traceroute is that it able to do multiple traceroute simultanaeously by putting the hosts you want to traceroute in the list. To visualize the traceroute result in graphical view, you need imagemagick and graphviz.
 Multiple tracerouting in actions.
 This is the traceroute result displayed in graphical view by using graphviz and ImageMagick.
Monday, November 28, 2005
[[[Dissectible.org]]]
I will be launching a new site call Dissectible.org soon, currently I'm busy with the write up on Sguil Installation Guide On OpenBSD-3.8 and FreeBSD Network Analyst Workstation Handbook, my hand is full now and kind of busy.
So why Dissectible.org? I personally like the word dissect which defined in FreeDictionary as
1. To cut apart or separate (tissue), especially for anatomical study.
2. To examine, analyze, or criticize in minute detail: dissected the plan afterward to learn why it had failed. See Synonyms at analyze.
Everything is dissectible from my point of view, as long as you have enough data in hand, data collection is important these days as without it, nothing is dissectible, that's where Sguil fits my need :]
What Dissectible.org will be covering?
Dissectible.org will be a site where analysis and forensic implies, and I will upload all the write up to the site as well and currently I'm alone doing it, I do welcome inputs from you all and if you wish to join me, please do email me since I find myself hardly maintain all the stuffs of interest solely.
Stay tuned .....
Saturday, November 26, 2005
Live Analyst On Hacked Linux Server
When come to analyzing Linux Hacked Server in live, most properly it's HARD. It's HARD in the sense that we can't do the imaging and perform dead analysis since the server requires no down time. However we can actually track down what is currently running or malfunctioning in our server with ps, netstat and memgrep, some might said you will have to have clean binaries for forensic purpose which is trusted, it's certainly true and you can actually download the static binaries from the Incident Response Live CD - Helix, the site provides the static binaries or you can compile your own trusted binaries if you want.
Memgrep is a tool to search, replace, or dump arbitrary memory from running applications and core files. Potential applications for memgrep include reverse engineering, debugging, and vulnerability assessment.
Below are the steps that I have taken on my demo server. I have found there's a suspicious process called kf.
shell>ps auxww | grep kf
nobody 23437 0.0 0.0 1468 856 ? S Nov17 0:00 ./kf
I choose to use -p options since it will show the pid. This is good when you want to track down what process is currently having listenning port, or maybe initiating connection to internet.
shell>netstat -anp | grep 23437
tcp 0 0 0.0.0.0:3442 0.0.0.0:* LISTEN 23437/kf
unix 2 [ ] STREAM CONNECTED 399392712 23437/kf
Since we do not know what is kf doing, some prefer to use lsof -p 23437, for me I just use memgrep here since memgrep will provide more valuable info. The -L option will list memory segments of a process or core file.
shell>cd /nsm/memgrep/
shell> ./memgrep -p 23437 -L
.bss => 0804a874
.data => 0804a6a0 (96 bytes, 0 Kbytes)
.rodata => 0804959c (226 bytes, 0 Kbytes)
.text => 080489ac (3028 bytes, 2 Kbytes)
stack => bffe60bc
shell> ./memgrep -p 23437 -d -a 0x0804a6a0 -l 96
96 bytes starting at 0804a6a0 (+/- 0) as hexint...
0804a6a0: 00000000 00000000 0804a7d4 00000000 ................
0804a6b0: 00000000 00000000 00000000 00000000 ................
0804a6c0: 30786168 00000072 00000000 00000000 hax0r...........
0804a6d0: 00000000 00000000 00000000 00000000 ................
0804a6e0: 61202d3d 69696170 43616220 3030646b =- apaii baCkd00
0804a6f0: 63282072 30322029 2d203430 00000a3d r (c) 2004 -=...
Do you see the haxor :]
shell> ./memgrep -p 23437 -d -a 0x0804959c -l 226
226 bytes starting at 0804959c (+/- 0) as hexint...
0804959c: 00000003 00020001 73736170 00206477 ........passwd .
080495ac: 6b637546 2166664f 000a2121 73727170 FuckOff!!!..pqrs
080495bc: 77767574 617a7978 65646362 32313000 tuvwxyzabcde.012
080495cc: 36353433 61393837 65646362 642f0066 3456789abcdef./d
080495dc: 702f7665 00786d74 7665642f 7974702f ev/ptmx./dev/pty
080495ec: 65642f00 74742f76 6f730079 74656b63 ./dev/tty.socket
080495fc: 6e696200 696c0064 6e657473 63666e00 .bind.listen.nfc
0804960c: 20736920 72617473 676e6974 002e2e2e is starting....
0804961c: 202c4b4f 20646970 6425203d 6557000a OK, pid = %d..We
0804962c: 6d30636c 30742033 72347020 7a316461 lc0m3 t0 p4rad1z
0804963c: 316b2033 73306464 002f000a 7665642f 3 k1dd0s.././dev
0804964c: 6c756e2f 6873006c 00692d00 454d4f48 /null.sh.-i.HOME
0804965c: 0073253d 276e6143 6f662074 70206b72 =%s.Can't fork p
0804966c: 202c7974 21657962 622f000a 732f6e69 ty, bye!../bin/s
0804967c: 00000068 /sh.
If you know apaii backd00r or it's variant, please do feedback since I can't find any info regarding it in the internet after googling ..... til next time :]
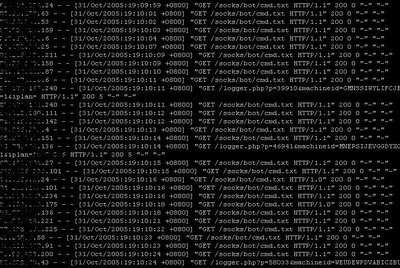
Spamming
I'm dealing with spammers and phishers most of the time these days, and currently performing analysis process on them, this is one of the interesting log that I currently have in my hand.
Shutting down spamming host is not effective from my point of view these days, way too many open proxies, smtp relay daemons out there, not blaming windows but windows users who never patch their system or not educated to understand cyber threats.
The root of cause is still the man behind spamming, catch them and proceed to prosecute, I found no tolerate to spammers and phishers, they ain't hackers, they are just bunch of f**ker who use internet as a channel to create junk and make money, out of that, they are nothing.
And if you are spammer or phisher, yet you read my blog, don't hate me because you should know who you are.
No One Loves You!
Friday, November 25, 2005
Using Smbclient - Entering Windows World
This is just quick view of smbclient usage, you should be able to figure it out yourself by using man page. I have used it for my daily task since the real world is always kind of mix.
The -L option basically list out the share available on the host by providing the hostname and -I for specifying IP address, -I is useful when you don't have any name resolver, however you can actualy add a liner to /etc/hosts file which may do the trick.
Thursday, November 24, 2005
My Own Sguil Logo
Personally I don't really like the Sguil logo, thus I decide to create my own logo, since Sguil is practicing the NSM model, thus my idea is simple, a digital monkey with a sensor receiving the intrusion/extrusion signal. And if you notice carefully, I have the signal written in NSM (:])
This is just my initial design, I will make it better once I have time. Give comments if you think it sucks :P
This is just my initial design, I will make it better once I have time. Give comments if you think it sucks :P
Thanks to Quak, my pal who do a graphic editing for me since I'm not keen in that.
Gdesklets - The Ultimate Resource Killer
I have been using Ubuntu Linux for quite sometimes, one of the eye candy software that I'm using is gdekslets, however gdesklets is the ultimate resource killer, I have this Ubuntu box with gdesklets installed and running starterbar. I have never used the starter bar to launch any applications but it seems that gdesklets quietly consumes the virtual memory size, at first I have acroread and firefox running and it crashed due to insufficient vm, then when it reaches 700MB vm size, finally gdesklets crashing and I able to launch other applications, the system becomes normal and no lagging anymore. Gdesklets consumes a little vm size from time to time and something must be wrong in the application. I bet if I have 2G swap partition, the vm size that consumed by gdesklets may hit 1G. What the hell is this little piece of software.
If you want to use eye candy docking software, go gkrellm or conky, it's much more lightweight compare to this monster.
If you want to use eye candy docking software, go gkrellm or conky, it's much more lightweight compare to this monster.

Seeing is Believing!
Wednesday, November 23, 2005
MySQL 5 On OpenBSD 3.8
Binary Base Installation
Download mysql-standard-5.0.15-openbsd3.7-i386.tar.gz or mysql-5.0.16.tar.gz via http://ftp.sayclub.com/pub/mysql/Downloads/MySQL-5.0/
shell>tar xvzf mysql-standard-5.0.15-openbsd3.7-i386.tar.gz
shell>groupadd mysql
shell>useradd -g mysql mysql
shell>cd /usr/local/src
shell>tar xvzf mysql-standard-5.0.15-openbsd3.7-i386.tar.gz
shell>ln -s ./mysql-standard-5.0.15-openbsd3.7-i386 /usr/local/mysql
shell>cd /usr/local/mysql
shell>scripts/mysql_install_db --user=mysql
shell>chwon -R root .
shell>chown -R mysql data
shell>chgrp -R mysql .
Running mysql server
shell>/usr/local/mysql/bin/mysql_safe --user=mysql --basedir=/usr/local/mysql --datadir=/nsm/data \ --pid-file=/usr/local/mysql/data/mysql.pid
Source Base Installation(Special thanks to Transporter for this)
shell>CC=gcc CFLAGS="-02 -fno-strength-reduce" CXX=gcc CXXFLAGS="-02 -fno-rtti -fno-exceptions -felide-constructors -fno-strength-reduce"
shell>./configure --prefix=/var/mysql --enable-assembler --enable-openssl --enable-thread-safe-client
shell>gmake
shell>gmake install
shell>scripts/mysql_install_db
shell>chown -R root /var/mysql
shell>chown -R mysql /var/mysql/var
shell>chgrp -R mysql /var/mysql
shell>cp support-files/my-medium.cnf /etc/my.cnf
shell>/var/mysql/bin/mysqld_safe --user=mysql &
I still remember it was a pain to get mysql compiled from source on OpenBSD platform last time and it seems MySQL 5 concerning about OpenBSD users as well and providing Binary installation. If you are sguil users, considered you need to install MySQL 5 from source since mysqltcl requires libmysqlclient.so to compile properly.
Monday, November 21, 2005
Scapy Portability Page
My Scapy Quick Installation Guide has been imported to Scapy Portability Page. You can find it out here. It' my pleasure to help out and thanks to the Scapy Community in mailing list being so friendly and helpful.
Saturday, November 19, 2005
Scapy On FreeBSD 6.0
Quick Installation Guide
python-2.4.1.3(/usr/ports/lang/python)
libpcap-0.9.4
libdnet-1.10 (/usr/ports/net/libdnet)
py24-pcap-0.4/0.5 (/usr/ports/net/py-pcap)
py24-pycrypto-2.0.1 (/usr/ports/security/py-pycrypto)
py24-PyX-0.8 (/usr/ports/graphics/py-PyX)
py-gnuplot-1.7 (/usr/ports/math/py-gnuplot/)
ImageMagick-6.2.2.1(/usr/ports/graphics/ImageMagick)
graphviz-2.2 (/usr/ports/graphics/graphviz)
Before you install those packages, basically you can specify which mirror site you want to fetch,
If you are using tcsh or csh,
shell>setenv PACKAGESITE \ ftp://ftp5.freebsd.org/pub/FreeBSD/releases/i386/6.0-RELEASE/packages/All/
If you are using ksh or bash,
shell>export PACKAGESITE=\ ftp://ftp5.freebsd.org/pub/FreeBSD/releases/i386/6.0-RELEASE/packages/All/
You can actually find the mirror sites in the link below.
http://www.freebsd.org/releases/6.0R/announce.html
Installing PYTHON
shell>pkg_add -r python-2.4.1.3
Installing libpcap from source
libpcap-0.9.4(Packet Capture Library)
shell>wget http://www.tcpdump.org/release/libpcap-0.9.4.tar.gz
shell>tar xvzf libpcap-0.9.4.tar.gz
shell>cd libpcap-0.9.4
shell>./configure
shell>make && make install
Workaround for py24-libpcap-0.4
py24-pcap-0.4 (/usr/ports/net/py-pcap)
shell>cd /usr/ports/net/py-pcap/
shell>make
shell>cd work/pylibpcap-0.4/
#Replace line 34 of pcap.py by: if 0:
shell>cd ../..
shell>make install clean
Thanks to Guillaume Valadon for this :).
Workaround for py24-libpcap-0.5
That's a change in behavior between pylibpcap 0.4 and 0.5. If pcap_next fails it used to return a 3-tuple (garbage, None, garbage); now it just returns None, which (as the TypeError points out) is not subscriptable.
That line in scapy could presumably be changed to pkt = (self.ins.next() or (None,None,None)) [1] or the loop could be changed to
while 1:
nextpkt = self.ins.next()
if nextpkt:
( pktlen, pkt, pkttime ) = nextpkt
break
Installing Other Needed Apps
For py24-pycrypto, py24-PyX, py-gnuplot, graphiviz, ImageMagick, you can just install using packages.
shell>pkg_add -vr py24-pycrypto py24-PyX py-gnuplot ImageMagick graphviz
For PyX font mapping,
Check out /usr/local/etc/pyxrc, or you can create a file under user directory, ~/.pyxrc
Edit this line,
fontmaps = psfonts.map bsr.map
then run
shell>updmap
#updmap is a utility that creates font config for dvips,pdftex, xdvi and etc. It updates font map files for Tex output drivers, thanks ctime for the tips.
To avoid informational message "Can't Open Ethertypes Files" when you run Scapy,
Download the ethertypes file that from this url - http://pierre.droids-corp.org/scapy/ethertypes and put it into /etc directory.
Get the latest Scapy now!
shell>wget http://www.secdev.org/projects/scapy/files/scapy.py
Now you can just run Scapy by typing ./scapy.py -s new.session
Extra Note:
To import Scapy as python module
shell>cp scapy.py /usr/local/lib/python2.4/
then you can launch python
shell>python
In python shell
import scapy
from scapy import *
Scapy requires lots of dependencies, so I have to install it. Luckily we have all of them in ports/packages and you can go for either one. For me I prefer package as it is fast instead of compiling from port.
python-2.4.1.3(/usr/ports/lang/python)
libpcap-0.9.4
libdnet-1.10 (/usr/ports/net/libdnet)
py24-pcap-0.4/0.5 (/usr/ports/net/py-pcap)
py24-pycrypto-2.0.1 (/usr/ports/security/py-pycrypto)
py24-PyX-0.8 (/usr/ports/graphics/py-PyX)
py-gnuplot-1.7 (/usr/ports/math/py-gnuplot/)
ImageMagick-6.2.2.1(/usr/ports/graphics/ImageMagick)
graphviz-2.2 (/usr/ports/graphics/graphviz)
Before you install those packages, basically you can specify which mirror site you want to fetch,
If you are using tcsh or csh,
shell>setenv PACKAGESITE \ ftp://ftp5.freebsd.org/pub/FreeBSD/releases/i386/6.0-RELEASE/packages/All/
If you are using ksh or bash,
shell>export PACKAGESITE=\ ftp://ftp5.freebsd.org/pub/FreeBSD/releases/i386/6.0-RELEASE/packages/All/
You can actually find the mirror sites in the link below.
http://www.freebsd.org/releases/6.0R/announce.html
Installing PYTHON
shell>pkg_add -r python-2.4.1.3
Installing libpcap from source
libpcap-0.9.4(Packet Capture Library)
shell>wget http://www.tcpdump.org/release/libpcap-0.9.4.tar.gz
shell>tar xvzf libpcap-0.9.4.tar.gz
shell>cd libpcap-0.9.4
shell>./configure
shell>make && make install
Installing libdnet-1.10 from port
*Note on libdnet - You have to install this by using port to enable python wrapping.
shell>cd /usr/ports/net/libdnet
shell>make WITH_PYTHON=yes install
Installing py24-pcap
*Note on py24-pcap - If you are installing py24-pcap-0.4, use port, and if you are going for py24-pcap-0.5 which is current, you can just install the package. However you still need to follow steps below to get Scapy working.
Workaround for py24-libpcap-0.4
py24-pcap-0.4 (/usr/ports/net/py-pcap)
shell>cd /usr/ports/net/py-pcap/
shell>make
shell>cd work/pylibpcap-0.4/
#Replace line 34 of pcap.py by: if 0:
shell>cd ../..
shell>make install clean
Thanks to Guillaume Valadon for this :).
Workaround for py24-libpcap-0.5
That's a change in behavior between pylibpcap 0.4 and 0.5. If pcap_next fails it used to return a 3-tuple (garbage, None, garbage); now it just returns None, which (as the TypeError points out) is not subscriptable.
That line in scapy could presumably be changed to pkt = (self.ins.next() or (None,None,None)) [1] or the loop could be changed to
while 1:
nextpkt = self.ins.next()
if nextpkt:
( pktlen, pkt, pkttime ) = nextpkt
break
Alternatively pylibpcap could be changed to return (None,None,None) in that case ... that seems like a less natural value than a plain old None, but it would also simplify the calling code a little bit in cases like this.
Just use the first option which is changing the self.ins.next()[1] to (self.ins.next() or (None,None,None)) will do. Thanks to Wim Lewis for pointing out in mailing list. Philippe has emailed and telling it will be resolved in next version -> 1.0.29.
Just use the first option which is changing the self.ins.next()[1] to (self.ins.next() or (None,None,None)) will do. Thanks to Wim Lewis for pointing out in mailing list. Philippe has emailed and telling it will be resolved in next version -> 1.0.29.
Installing Other Needed Apps
For py24-pycrypto, py24-PyX, py-gnuplot, graphiviz, ImageMagick, you can just install using packages.
shell>pkg_add -vr py24-pycrypto py24-PyX py-gnuplot ImageMagick graphviz
For PyX font mapping,
Check out /usr/local/etc/pyxrc, or you can create a file under user directory, ~/.pyxrc
Edit this line,
fontmaps = psfonts.map bsr.map
then run
shell>updmap
#updmap is a utility that creates font config for dvips,pdftex, xdvi and etc. It updates font map files for Tex output drivers, thanks ctime for the tips.
To avoid informational message "Can't Open Ethertypes Files" when you run Scapy,
Download the ethertypes file that from this url - http://pierre.droids-corp.org/scapy/ethertypes and put it into /etc directory.
Get the latest Scapy now!
shell>wget http://www.secdev.org/projects/scapy/files/scapy.py
Now you can just run Scapy by typing ./scapy.py -s new.session
Extra Note:
To import Scapy as python module
shell>cp scapy.py /usr/local/lib/python2.4/
then you can launch python
shell>python
In python shell
import scapy
from scapy import *
That's all for now, tire of writing, hopefully this is helpful for user who want to run Scapy on BSD system. Please appreciate my effort :)
I will be concentrating my writing for Sguil On OpenBSD 3.8 now, hopefully get it done before Sguil 0.6 release (:])
Scapy On OpenBSD 3.8
Quick Installation Guide
Below are all the packages/sources that need to be installed in order to get Scapy run properly.
python-2.3.5p2
libpcap-0.9.4.tar.gz
py-libpcap-0.3.1p0
libdnet-1.10
py-libdnet-1.10
py-crypto-2.0
gnuplot-4.0.0
py-gnuplot-1.7
PyX-0.8.1.tar.gz
graphviz-1.16p1
Installing libpcap from source
libpcap-0.9.4(Packet Capture Library)
shell>wget http://www.tcpdump.org/release/libpcap-0.9.4.tar.gz
shell>tar xvzf libpcap-0.9.4.tar.gz
shell>cd libpcap-0.9.4
shell>./configure
shell>make && make install
Depends on which shell you are using, the default is ksh
shell>export PKG_PATH=\ http://public.www.planetmirror.com/pub/OpenBSD/3.8/packages/i386/
Or if you are using csh
shell>setenv PKG_PATH \ http://public.www.planetmirror.com/pub/OpenBSD/3.8/packages/i386/
Note: You can find lots of mirrors from the this url, check one nearby your location -> http://www.openbsd.org/ftp.html#http
Now you can just install all the packages easily with
shell>pkg_add ${PKG_PATH}libdnet-1.10
shell>pkg_add ${PKG_PATH}python-2.3.5p2.tgz
shell>pkg_add ${PKG_PATH}py-libpcap-0.5.3p0.tgz
shell>pkg_add ${PKG_PATH}py-crypto-2.0.tgz
shell>pkg_add ${PKG_PATH}gnuplot-4.0.0.tgz
shell>pkg_add ${PKG_PATH}py-gnuplot-1.7.tgz
shell>pkg_add ${PKG_PATH}graphviz-1.16p1.tgz
Installing PyX-0.8.1 from source - for psdump() and pdfdump() to function properly
There's a slightly issue since PyX requires teTeX including font Type 1 and I have problem installing teTeX through package since I get mismatch md5 checksum. However you can still install PyX and use psfont.cmz instead.
PyX-0.8.1(Python Graphic Package)
Choose any PyX download mirror -> http://prdownloads.sourceforge.net/pyx/PyX-0.8.1.tar.gz?download
shell>wget http://optusnet.dl.sourceforge.net/sourceforge/pyx/PyX-0.8.1.tar.gz
shell>tar xvzf PyX-0.8.1.tar.gz
shell>cd PyX-0.8.1
shell>python setup.py build
shell>python setup.py install
To use font psfonts.cmz
shell>python
>>>from pyx import *
>>>text.set(fontmaps="/usr/local/share/texmf-dist/fonts/map/dvips/ams/psfonts.cmz")
>>>
To avoid informational message "Can't Open Ethertypes Files" when you run Scapy,
Download the ethertypes file that from this url ->
http://pierre.droids-corp.org/scapy/ethertypes and put it into /etc directory.
Get the latest Scapy now!
shell>wget http://www.secdev.org/projects/scapy/files/scapy.py
Now you can just run Scapy by typing ./scapy.py -s new.session
Finally I can get this writing done, next will be quick installation guide on FreeBSD, Stay tuned!
Scapy Sniff Offline Mode
In the previous post, I have shown how you can read pcap file with rdpcap(), however you can actually do the same thing with sniff(), if you run the sniff function in offline mode, you will be able to read the pcap file instead of sniffing on the fly. Then again you will be able to replay the pcap file with it :]
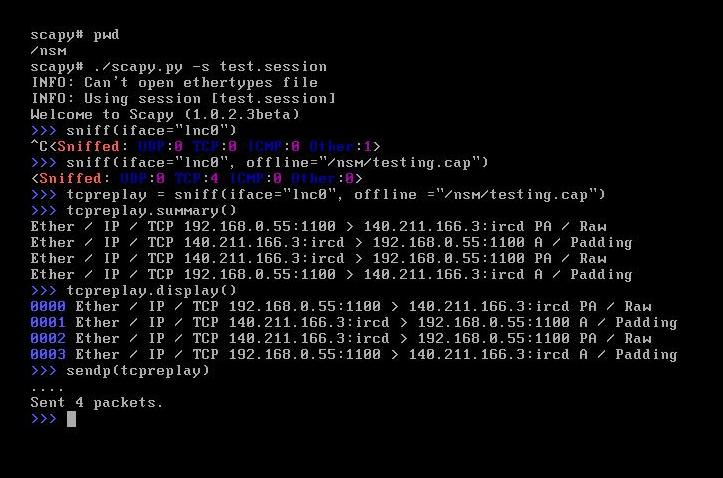
This time Scapy runs on OpenBSD platform, puffy rocks.
Friday, November 18, 2005
Packet Analysis with Scapy
So you like ethereal, the wonderful tool for network analyst. This is good new especially for OpenBSD user who no longer has ethereal in their ports/packages build. Download the Scapereal from this url and put it into the same directory as scapy.py, yet you need py-gtk to have it work properly. Thanks to Pierre for this. Below in the screenshots you will see how I import Scapereal which allow you to analyze packets via Ethereal-alike interface.
 After importing Scapereal, you will be able to call ethereal().
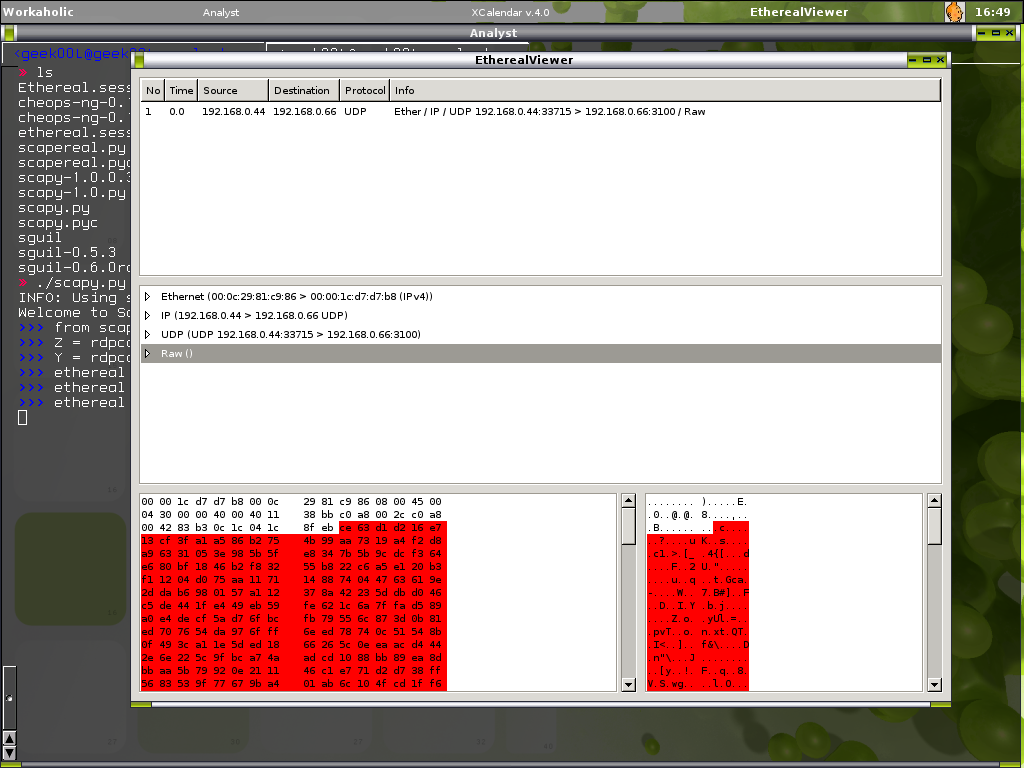 Highlighting is sweet!
 Nice huh ... ..
I have succesfully run scapy in OpenBSD as well and might be going to blog about Scapy Installation on both FreeBSD and OpenBSD in very close time. I'm still having little issue with FreeBSD Scapy build and will resolve it as soon as possible.
Special thanks to Guillaume Valadon for pointing me out the issue and workaround on FreeBSD Scapy build.
Special thanks to Guillaume Valadon for pointing me out the issue and workaround on FreeBSD Scapy build.
Thursday, November 17, 2005
Replaying Traffic With Scapy
While I have mentionned how powerful Scapy is, hereby a little demo of how you can use Scapy to work like Tcpreplay. I will show more and more little trick when I have time to explore Scapy and mastering python enough (:])
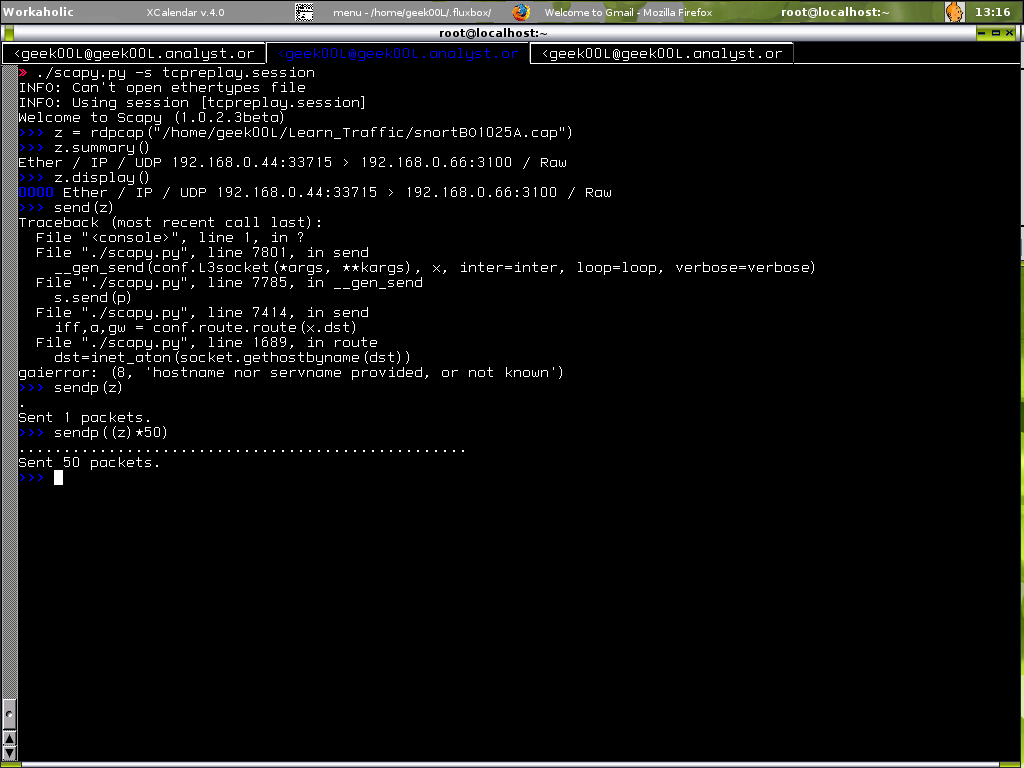 You can see I get an error while I try to send packet first time, send is used for sending packet at layer 3 which is not working since I'm in the LAN, though I send via sendp which is used to send packet at layer 2 and it works.
rdpcap is a function that used to read pcap file, while you can manipulate the pcap file, of course you can replay the network traffic with it.
Monday, November 14, 2005
Scapy = Master Once, Do It All Kung Fu
I have been mentionning quite a lot of times about scapy in my blog. Thanks to Philippe BIONDI, father of scapy and the rest of oss folks that help.
What is scapy anyway?
Scapy is a powerful interactive packet manipulation program that written in python. It allows you to do almost everything including packet forging, decoding, engineering, tracing, network mapping and etc. This is the only tool that deal with human limitation instead of program limitation. Why human limitation? It is because lacking of knowledge in certain network protocol, you can't create a functional packet that works with it. Scapy itself supports wide range of protocols and allows you to specify any fields in the packet, and the limitation again comes to the imagination of human being.
Master Once, Do It All Kung Fu?
Indeed yes, mastering Scapy ain't easy as it requires a little python scripting knowledge, another thing is that you are taking full advantage of Scapy only if you understand tcp/ip protocol well enough. RFC is a good place to start for that or you can go quick start by reading W. Richard. Stenvens TCP/IP Illustrated series.
Here i will demonstrate how to construct a packet which sending to remote host 192.168.0.66 and destination port 22 with syn flag.
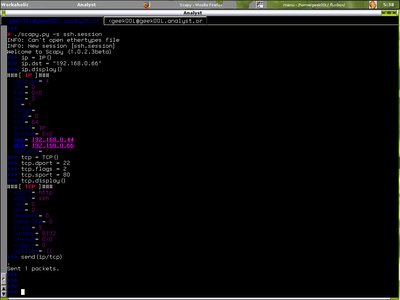 Scapy in Action!
What is scapy anyway?
Scapy is a powerful interactive packet manipulation program that written in python. It allows you to do almost everything including packet forging, decoding, engineering, tracing, network mapping and etc. This is the only tool that deal with human limitation instead of program limitation. Why human limitation? It is because lacking of knowledge in certain network protocol, you can't create a functional packet that works with it. Scapy itself supports wide range of protocols and allows you to specify any fields in the packet, and the limitation again comes to the imagination of human being.
Master Once, Do It All Kung Fu?
Indeed yes, mastering Scapy ain't easy as it requires a little python scripting knowledge, another thing is that you are taking full advantage of Scapy only if you understand tcp/ip protocol well enough. RFC is a good place to start for that or you can go quick start by reading W. Richard. Stenvens TCP/IP Illustrated series.
Here i will demonstrate how to construct a packet which sending to remote host 192.168.0.66 and destination port 22 with syn flag.
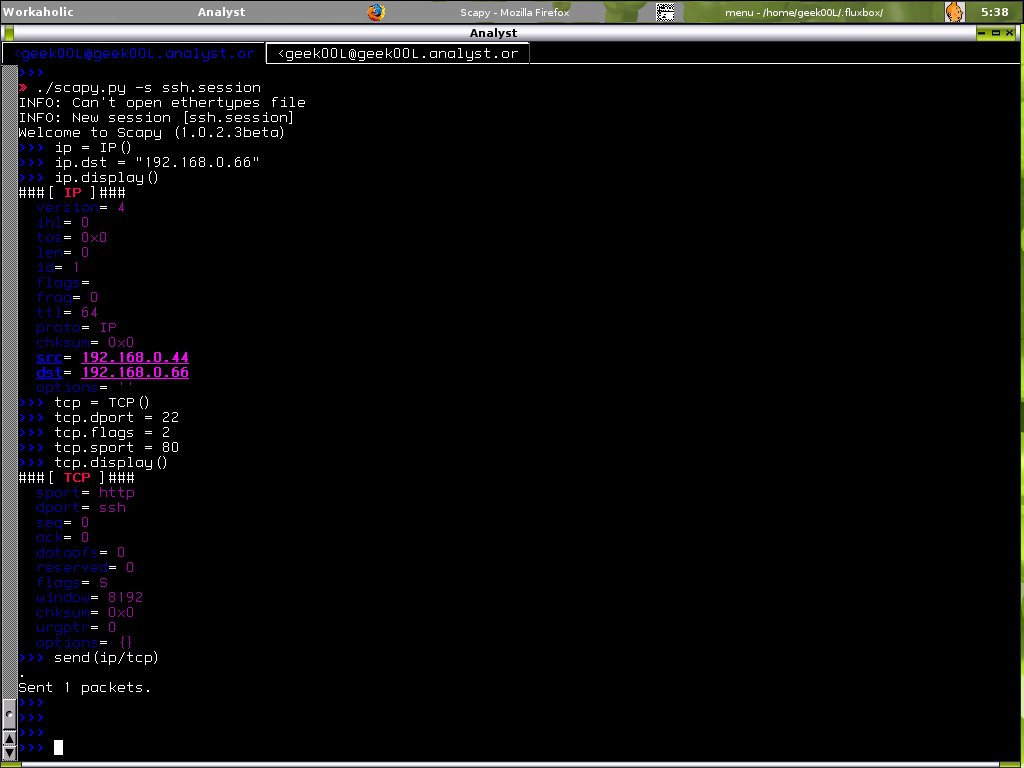 Scapy in Action!
 This is the tcpdump output in host 192.168.0.66.
There are more you can do with scapy, check out the Scapy site as it comes with very handy tutorial on the first page.
Monkeying with Scapy Kung FU (:])
<<- HITB 2003 - 2005 T-Shirt ->>
Here are my collections of HITB t-shirt since year 2003, I still keep them nicely. Now putting them in different display views :]


 I like the last shot, would prefer to s/c/X


 I like the last shot, would prefer to s/c/X
Subscribe to:
Posts (Atom)